| GREP(1) | User Commands | GREP(1) |
NAME
grep — print lines that match patterns
SYNOPSIS
grep [OPTION…] PATTERNS [FILE…]
grep [OPTION…] -e PATTERNS … [FILE…]
grep [OPTION…] -f PATTERN_FILE …
[FILE…]
DESCRIPTION
grep searches for PATTERNS in each FILE.
PATTERNS is one or more patterns separated by newline characters, and
grep prints each line that matches a pattern. Typically
PATTERNS should be quoted when grep is used in a shell
command.
A FILE of “—” stands for standard
input. If no FILE is given, recursive searches examine the working
directory, and nonrecursive searches read standard input.
OPTIONS
Generic Program Information
- —help
- Output a usage message and exit.
- -V, —version
- Output the version number of grep and exit.
Pattern Syntax
- -E,
—extended-regexp - Interpret PATTERNS as extended regular expressions (EREs, see
below). - -F,
—fixed-strings - Interpret PATTERNS as fixed strings, not regular expressions.
- -G,
—basic-regexp - Interpret PATTERNS as basic regular expressions (BREs, see below).
This is the default. - -P,
—perl-regexp - Interpret PATTERNS as Perl-compatible regular expressions (PCREs).
This option is experimental when combined with the -z
(—null-data) option, and grep -P may warn of unimplemented
features.
Matching Control
- -e PATTERNS,
—regexp=PATTERNS - Use PATTERNS as the patterns. If this option is used multiple times
or is combined with the -f (—file) option, search for all
patterns given. This option can be used to protect a pattern beginning
with “-”. - -f FILE,
—file=FILE - Obtain patterns from FILE, one per line. If this option is used
multiple times or is combined with the -e (—regexp) option,
search for all patterns given. The empty file contains zero patterns, and
therefore matches nothing. If FILE is — , read patterns from
standard input. - -i,
—ignore-case - Ignore case distinctions in patterns and input data, so that characters
that differ only in case match each other. - —no-ignore-case
- Do not ignore case distinctions in patterns and input data. This is the
default. This option is useful for passing to shell scripts that already
use -i, to cancel its effects because the two options override each
other. - -v,
—invert-match - Invert the sense of matching, to select non-matching lines.
- -w,
—word-regexp - Select only those lines containing matches that form whole words. The test
is that the matching substring must either be at the beginning of the
line, or preceded by a non-word constituent character. Similarly, it must
be either at the end of the line or followed by a non-word constituent
character. Word-constituent characters are letters, digits, and the
underscore. This option has no effect if -x is also specified. - -x,
—line-regexp - Select only those matches that exactly match the whole line. For a regular
expression pattern, this is like parenthesizing the pattern and then
surrounding it with ^ and $.
General Output Control
- -c, —count
- Suppress normal output; instead print a count of matching lines for each
input file. With the -v, —invert-match option (see above),
count non-matching lines. - —color[=WHEN],
—colour[=WHEN] - Surround the matched (non-empty) strings, matching lines, context lines,
file names, line numbers, byte offsets, and separators (for fields and
groups of context lines) with escape sequences to display them in color on
the terminal. The colors are defined by the environment variable
GREP_COLORS. WHEN is never, always, or
auto. - -L,
—files-without-match - Suppress normal output; instead print the name of each input file from
which no output would normally have been printed. - -l,
—files-with-matches - Suppress normal output; instead print the name of each input file from
which output would normally have been printed. Scanning each input file
stops upon first match. - -m NUM,
—max-count=NUM - Stop reading a file after NUM matching lines. If NUM is
zero, grep stops right away without reading input. A NUM of
-1 is treated as infinity and grep does not stop; this is the
default. If the input is standard input from a regular file, and
NUM matching lines are output, grep ensures that the
standard input is positioned to just after the last matching line before
exiting, regardless of the presence of trailing context lines. This
enables a calling process to resume a search. When grep stops after
NUM matching lines, it outputs any trailing context lines. When the
-c or —count option is also used, grep does not
output a count greater than NUM. When the -v or
—invert-match option is also used, grep stops after
outputting NUM non-matching lines. - -o,
—only-matching - Print only the matched (non-empty) parts of a matching line, with each
such part on a separate output line. - -q, —quiet,
—silent - Quiet; do not write anything to standard output. Exit immediately with
zero status if any match is found, even if an error was detected. Also see
the -s or —no-messages option. - -s,
—no-messages - Suppress error messages about nonexistent or unreadable files.
Output Line Prefix Control
- -b,
—byte-offset - Print the 0-based byte offset within the input file before each line of
output. If -o (—only-matching) is specified, print the
offset of the matching part itself. - -H,
—with-filename - Print the file name for each match. This is the default when there is more
than one file to search. This is a GNU extension. - -h,
—no-filename - Suppress the prefixing of file names on output. This is the default when
there is only one file (or only standard input) to search. - —label=LABEL
- Display input actually coming from standard input as input coming from
file LABEL. This can be useful for commands that transform a file’s
contents before searching, e.g., gzip -cd foo.gz | grep —label=foo -H
‘some pattern’. See also the -H option. - -n,
—line-number - Prefix each line of output with the 1-based line number within its input
file. - -T,
—initial-tab - Make sure that the first character of actual line content lies on a tab
stop, so that the alignment of tabs looks normal. This is useful with
options that prefix their output to the actual content:
-H,-n, and -b. In order to improve the probability
that lines from a single file will all start at the same column, this also
causes the line number and byte offset (if present) to be printed in a
minimum size field width. - -Z, —null
- Output a zero byte (the ASCII NUL character) instead of the
character that normally follows a file name. For example, grep -lZ
outputs a zero byte after each file name instead of the usual newline.
This option makes the output unambiguous, even in the presence of file
names containing unusual characters like newlines. This option can be used
with commands like find -print0, perl -0, sort -z,
and xargs -0 to process arbitrary file names, even those that
contain newline characters.
Context Line Control
- -A NUM,
—after-context=NUM - Print NUM lines of trailing context after matching lines. Places a
line containing a group separator (—) between contiguous groups of
matches. With the -o or —only-matching option, this has no
effect and a warning is given. - -B NUM,
—before-context=NUM - Print NUM lines of leading context before matching lines. Places a
line containing a group separator (—) between contiguous groups of
matches. With the -o or —only-matching option, this has no
effect and a warning is given. - -C NUM,
—NUM, —context=NUM - Print NUM lines of output context. Places a line containing a group
separator (—) between contiguous groups of matches. With the
-o or —only-matching option, this has no effect and a
warning is given. - —group-separator=SEP
- When -A, -B, or -C are in use, print SEP
instead of — between groups of lines. - —no-group-separator
- When -A, -B, or -C are in use, do not print a
separator between groups of lines.
File and Directory Selection
- -a, —text
- Process a binary file as if it were text; this is equivalent to the
—binary-files=text option. - —binary-files=TYPE
- If a file’s data or metadata indicate that the file contains binary data,
assume that the file is of type TYPE. Non-text bytes indicate
binary data; these are either output bytes that are improperly encoded for
the current locale, or null input bytes when the -z option is not
given.
- By default, TYPE is binary, and grep suppresses
output after null input binary data is discovered, and suppresses output
lines that contain improperly encoded data. When some output is
suppressed, grep follows any output with a message to standard
error saying that a binary file matches. - If TYPE is without-match, when grep discovers null
input binary data it assumes that the rest of the file does not match;
this is equivalent to the -I option. - If TYPE is text, grep processes a binary file as if
it were text; this is equivalent to the -a option. - When type is binary, grep may treat non-text bytes as
line terminators even without the -z option. This means choosing
binary versus text can affect whether a pattern matches a
file. For example, when type is binary the pattern q$
might match q immediately followed by a null byte, even though
this is not matched when type is text. Conversely, when
type is binary the pattern . (period) might not match
a null byte. - Warning: The -a option might output binary garbage, which
can have nasty side effects if the output is a terminal and if the
terminal driver interprets some of it as commands. On the other hand, when
reading files whose text encodings are unknown, it can be helpful to use
-a or to set LC_ALL=’C’ in the environment, in order to find
more matches even if the matches are unsafe for direct display.
- -D ACTION,
—devices=ACTION - If an input file is a device, FIFO or socket, use ACTION to process
it. By default, ACTION is read, which means that devices are
read just as if they were ordinary files. If ACTION is skip,
devices are silently skipped. - -d ACTION,
—directories=ACTION - If an input file is a directory, use ACTION to process it. By
default, ACTION is read, i.e., read directories just as if
they were ordinary files. If ACTION is skip, silently skip
directories. If ACTION is recurse, read all files under each
directory, recursively, following symbolic links only if they are on the
command line. This is equivalent to the -r option. - —exclude=GLOB
- Skip any command-line file with a name suffix that matches the pattern
GLOB, using wildcard matching; a name suffix is either the whole
name, or a trailing part that starts with a non-slash character
immediately after a slash (/) in the name. When searching
recursively, skip any subfile whose base name matches GLOB; the
base name is the part after the last slash. A pattern can use *,
?, and […] as wildcards, and to quote a
wildcard or backslash character literally. - —exclude-from=FILE
- Skip files whose base name matches any of the file-name globs read from
FILE (using wildcard matching as described under
—exclude). - —exclude-dir=GLOB
- Skip any command-line directory with a name suffix that matches the
pattern GLOB. When searching recursively, skip any subdirectory
whose base name matches GLOB. Ignore any redundant trailing slashes
in GLOB. - -I
- Process a binary file as if it did not contain matching data; this is
equivalent to the —binary-files=without-match option. - —include=GLOB
- Search only files whose base name matches GLOB (using wildcard
matching as described under —exclude). If contradictory
—include and —exclude options are given, the last matching
one wins. If no —include or —exclude options match, a file
is included unless the first such option is —include. - -r,
—recursive - Read all files under each directory, recursively, following symbolic links
only if they are on the command line. Note that if no file operand is
given, grep searches the working directory. This is equivalent to
the -d recurse option. - -R,
—dereference-recursive - Read all files under each directory, recursively. Follow all symbolic
links, unlike -r.
Other Options
- —line-buffered
- Use line buffering on output. This can cause a performance penalty.
- -U, —binary
- Treat the file(s) as binary. By default, under MS-DOS and MS-Windows,
grep guesses whether a file is text or binary as described for the
—binary-files option. If grep decides the file is a text
file, it strips the CR characters from the original file contents (to make
regular expressions with ^ and $ work correctly). Specifying
-U overrules this guesswork, causing all files to be read and
passed to the matching mechanism verbatim; if the file is a text file with
CR/LF pairs at the end of each line, this will cause some regular
expressions to fail. This option has no effect on platforms other than
MS-DOS and MS-Windows. - -z,
—null-data - Treat input and output data as sequences of lines, each terminated by a
zero byte (the ASCII NUL character) instead of a newline. Like the
-Z or —null option, this option can be used with commands
like sort -z to process arbitrary file names.
REGULAR EXPRESSIONS
A regular expression is a pattern that describes a set of strings.
Regular expressions are constructed analogously to arithmetic expressions,
by using various operators to combine smaller expressions.
grep understands three different versions of regular
expression syntax: “basic” (BRE), “extended”
(ERE) and “perl” (PCRE). In GNU grep, basic and
extended regular expressions are merely different notations for the same
pattern-matching functionality. In other implementations, basic regular
expressions are ordinarily less powerful than extended, though occasionally
it is the other way around. The following description applies to extended
regular expressions; differences for basic regular expressions are
summarized afterwards. Perl-compatible regular expressions have different
functionality, and are documented in pcre2syntax(3) and
pcre2pattern(3), but work only if PCRE support is enabled.
The fundamental building blocks are the regular expressions that
match a single character. Most characters, including all letters and digits,
are regular expressions that match themselves. Any meta-character with
special meaning may be quoted by preceding it with a backslash.
The period . matches any single character. It is
unspecified whether it matches an encoding error.
Character Classes and Bracket Expressions
A bracket expression is a list of characters enclosed by
[ and ]. It matches any single character in that list. If the
first character of the list is the caret ^ then it matches any
character not in the list; it is unspecified whether it matches an
encoding error. For example, the regular expression [0123456789]
matches any single digit.
Within a bracket expression, a range expression consists of
two characters separated by a hyphen. It matches any single character that
sorts between the two characters, inclusive, using the locale’s collating
sequence and character set. For example, in the default C locale,
[a-d] is equivalent to [abcd]. Many locales sort characters in
dictionary order, and in these locales [a-d] is typically not
equivalent to [abcd]; it might be equivalent to [aBbCcDd], for
example. To obtain the traditional interpretation of bracket expressions,
you can use the C locale by setting the LC_ALL environment variable
to the value C.
Finally, certain named classes of characters are predefined within
bracket expressions, as follows. Their names are self explanatory, and they
are [:alnum:], [:alpha:], [:blank:], [:cntrl:],
[:digit:], [:graph:], [:lower:], [:print:],
[:punct:], [:space:], [:upper:], and [:xdigit:].
For example, [[:alnum:]] means the character class of numbers and
letters in the current locale. In the C locale and ASCII character set
encoding, this is the same as [0-9A-Za-z]. (Note that the brackets in
these class names are part of the symbolic names, and must be included in
addition to the brackets delimiting the bracket expression.) Most
meta-characters lose their special meaning inside bracket expressions. To
include a literal ] place it first in the list. Similarly, to include
a literal ^ place it anywhere but first. Finally, to include a
literal — place it last.
Anchoring
The caret ^ and the dollar sign $ are
meta-characters that respectively match the empty string at the beginning
and end of a line.
The Backslash Character and Special Expressions
The symbols < and > respectively match the
empty string at the beginning and end of a word. The symbol b
matches the empty string at the edge of a word, and B matches the
empty string provided it’s not at the edge of a word. The symbol
w is a synonym for [_[:alnum:]] and W is a synonym
for [^_[:alnum:]].
Repetition
A regular expression may be followed by one of several repetition
operators:
- ?
- The preceding item is optional and matched at most once.
- *
- The preceding item will be matched zero or more times.
- +
- The preceding item will be matched one or more times.
- {n}
- The preceding item is matched exactly n times.
- {n,}
- The preceding item is matched n or more times.
- {,m}
- The preceding item is matched at most m times. This is a GNU
extension. - {n,m}
- The preceding item is matched at least n times, but not more than
m times.
Concatenation
Two regular expressions may be concatenated; the resulting regular
expression matches any string formed by concatenating two substrings that
respectively match the concatenated expressions.
Alternation
Two regular expressions may be joined by the infix operator
|; the resulting regular expression matches any string matching
either alternate expression.
Precedence
Repetition takes precedence over concatenation, which in turn
takes precedence over alternation. A whole expression may be enclosed in
parentheses to override these precedence rules and form a subexpression.
Back-references and Subexpressions
The back-reference n, where n is a single
digit, matches the substring previously matched by the nth
parenthesized subexpression of the regular expression.
Basic vs Extended Regular Expressions
In basic regular expressions the meta-characters ?,
+, {, |, (, and ) lose their special
meaning; instead use the backslashed versions ?, +,
{, |, (, and ).
EXIT STATUS
Normally the exit status is 0 if a line is selected, 1 if no lines
were selected, and 2 if an error occurred. However, if the -q or
—quiet or —silent is used and a line is selected, the exit
status is 0 even if an error occurred.
ENVIRONMENT
The behavior of grep is affected by the following
environment variables.
The locale for category LC_foo is specified by
examining the three environment variables LC_ALL,
LC_foo, LANG, in that order. The first of these
variables that is set specifies the locale. For example, if LC_ALL is
not set, but LC_MESSAGES is set to pt_BR, then the Brazilian
Portuguese locale is used for the LC_MESSAGES category. The C locale
is used if none of these environment variables are set, if the locale
catalog is not installed, or if grep was not compiled with national
language support (NLS). The shell command locale -a lists locales
that are currently available.
- GREP_COLORS
- Controls how the —color option highlights output. Its value is a
colon-separated list of capabilities that defaults to
ms=01;31:mc=01;31:sl=:cx=:fn=35:ln=32:bn=32:se=36 with the
rv and ne boolean capabilities omitted (i.e., false).
Supported capabilities are as follows.
- sl=
- SGR substring for whole selected lines (i.e., matching lines when the
-v command-line option is omitted, or non-matching lines when
-v is specified). If however the boolean rv capability and
the -v command-line option are both specified, it applies to
context matching lines instead. The default is empty (i.e., the terminal’s
default color pair). - cx=
- SGR substring for whole context lines (i.e., non-matching lines when the
-v command-line option is omitted, or matching lines when -v
is specified). If however the boolean rv capability and the
-v command-line option are both specified, it applies to selected
non-matching lines instead. The default is empty (i.e., the terminal’s
default color pair). - rv
- Boolean value that reverses (swaps) the meanings of the sl= and
cx= capabilities when the -v command-line option is
specified. The default is false (i.e., the capability is omitted). - mt=01;31
- SGR substring for matching non-empty text in any matching line (i.e., a
selected line when the -v command-line option is omitted, or a
context line when -v is specified). Setting this is equivalent to
setting both ms= and mc= at once to the same value. The
default is a bold red text foreground over the current line
background. - ms=01;31
- SGR substring for matching non-empty text in a selected line. (This is
only used when the -v command-line option is omitted.) The effect
of the sl= (or cx= if rv) capability remains active
when this kicks in. The default is a bold red text foreground over the
current line background. - mc=01;31
- SGR substring for matching non-empty text in a context line. (This is only
used when the -v command-line option is specified.) The effect of
the cx= (or sl= if rv) capability remains active when
this kicks in. The default is a bold red text foreground over the current
line background. - fn=35
- SGR substring for file names prefixing any content line. The default is a
magenta text foreground over the terminal’s default background. - ln=32
- SGR substring for line numbers prefixing any content line. The default is
a green text foreground over the terminal’s default background. - bn=32
- SGR substring for byte offsets prefixing any content line. The default is
a green text foreground over the terminal’s default background. - se=36
- SGR substring for separators that are inserted between selected line
fields (:), between context line fields, (—), and between
groups of adjacent lines when nonzero context is specified (—).
The default is a cyan text foreground over the terminal’s default
background. - ne
- Boolean value that prevents clearing to the end of line using Erase in
Line (EL) to Right (33[K) each time a colorized item ends. This is
needed on terminals on which EL is not supported. It is otherwise useful
on terminals for which the back_color_erase (bce) boolean
terminfo capability does not apply, when the chosen highlight colors do
not affect the background, or when EL is too slow or causes too much
flicker. The default is false (i.e., the capability is omitted).
Note that boolean capabilities have no =… part. They are
omitted (i.e., false) by default and become true when specified.
See the Select Graphic Rendition (SGR) section in the
documentation of the text terminal that is used for permitted values and
their meaning as character attributes. These substring values are integers
in decimal representation and can be concatenated with semicolons.
grep takes care of assembling the result into a complete SGR sequence
(33[…m). Common values to concatenate include 1 for
bold, 4 for underline, 5 for blink, 7 for inverse,
39 for default foreground color, 30 to 37 for
foreground colors, 90 to 97 for 16-color mode foreground
colors, 38;5;0 to 38;5;255 for 88-color and 256-color modes
foreground colors, 49 for default background color, 40 to
47 for background colors, 100 to 107 for 16-color mode
background colors, and 48;5;0 to 48;5;255 for 88-color and
256-color modes background colors.
- LC_ALL,
LC_COLLATE, LANG - These variables specify the locale for the LC_COLLATE category,
which determines the collating sequence used to interpret range
expressions like [a-z]. - LC_ALL,
LC_CTYPE, LANG - These variables specify the locale for the LC_CTYPE category, which
determines the type of characters, e.g., which characters are whitespace.
This category also determines the character encoding, that is, whether
text is encoded in UTF-8, ASCII, or some other encoding. In the C or POSIX
locale, all characters are encoded as a single byte and every byte is a
valid character. - LC_ALL,
LC_MESSAGES, LANG - These variables specify the locale for the LC_MESSAGES category,
which determines the language that grep uses for messages. The
default C locale uses American English messages. - POSIXLY_CORRECT
- If set, grep behaves as POSIX requires; otherwise, grep
behaves more like other GNU programs. POSIX requires that options that
follow file names must be treated as file names; by default, such options
are permuted to the front of the operand list and are treated as options.
Also, POSIX requires that unrecognized options be diagnosed as
“illegal”, but since they are not really against the law the
default is to diagnose them as “invalid”.
NOTES
This man page is maintained only fitfully; the full documentation
is often more up-to-date.
COPYRIGHT
Copyright 1998-2000, 2002, 2005-2023 Free Software Foundation,
Inc.
This is free software; see the source for copying conditions.
There is NO warranty; not even for MERCHANTABILITY or FITNESS FOR A
PARTICULAR PURPOSE.
BUGS
Reporting Bugs
Email bug reports to the bug-reporting address
⟨bug-grep@gnu.org⟩. An email archive
⟨https://lists.gnu.org/mailman/listinfo/bug-grep⟩ and a bug
tracker
⟨https://debbugs.gnu.org/cgi/pkgreport.cgi?package=grep⟩ are
available.
Known Bugs
Large repetition counts in the
{n,m} construct may cause grep to
use lots of memory. In addition, certain other obscure regular expressions
require exponential time and space, and may cause grep to run out of
memory.
Back-references are very slow, and may require exponential
time.
EXAMPLE
The following example outputs the location and contents of any
line containing “f” and ending in “.c”, within
all files in the current directory whose names contain “g” and
end in “.h”. The -n option outputs line numbers, the
— argument treats expansions of “*g*.h” starting with
“-” as file names not options, and the empty file /dev/null
causes file names to be output even if only one file name happens to be of
the form “*g*.h”.
$ grep -n -- 'f.*.c$' *g*.h /dev/null
argmatch.h:1:/* definitions and prototypes for argmatch.c
The only line that matches is line 1 of argmatch.h. Note that the
regular expression syntax used in the pattern differs from the globbing
syntax that the shell uses to match file names.
SEE ALSO
Regular Manual Pages
awk(1), cmp(1), diff(1), find(1),
perl(1), sed(1), sort(1), xargs(1),
read(2), pcre2(3), pcre2syntax(3),
pcre2pattern(3), terminfo(5), glob(7),
regex(7)
Full Documentation
A complete manual
⟨https://www.gnu.org/software/grep/manual/⟩ is available. If
the info and grep programs are properly installed at your
site, the command
- info grep
should give you access to the complete manual.
Перевод публикуется с сокращениями, автор оригинальной статьи Abhishek
Nair.
Название утилиты расшифровывается как Globally search for a REgular expression and Print matching lines. Grep в основном ищет заданный шаблон или регулярное выражение из стандартного ввода или файла и печатает соответствующие заданным критериям строки. Он часто используется для фильтрации ненужных деталей при выводе только необходимой информации из больших файлов журналов.
Мощь регулярных выражений в сочетании с поддерживаемыми опциями в grep делает это возможным.
Начнем!
Синтаксис команды
Grep ожидает шаблон и
необязательные аргументы вместе со списком файлов, если они используются без
конвейера.
$ grep [options] pattern [files]
Пример:
        $ grep my file.txt
my_file
$
1. Поиск в нескольких файлах
Grep позволяет искать
заданный шаблон не только в одном, но и в нескольких файлах с помощью масок (например, знака «*»):
$ sudo grep -i err /var/log/messages*
Вывод:
        $ sudo grep err /var/log/messages*
/var/log/messages:Dec 28 10:36:52 centos7vm kernel: ACPI: Using IOAPIC for interrupt routing
/var/log/messages:Dec 28 10:36:52 centos7vm kernel: ACPI: PCI Interrupt Link [LNKA] (IRQs 5 9 10 *11)
/var/log/messages:Dec 28 10:36:52 centos7vm kernel: ACPI: PCI Interrupt Link [LNKB] (IRQs 5 9 *10 11)
/var/log/messages:Dec 28 10:36:52 centos7vm kernel: ACPI: PCI Interrupt Link [LNKC] (IRQs 5 *9 10 11)
/var/log/messages:Dec 28 10:36:52 centos7vm kernel: ACPI: PCI Interrupt Link [LNKD] (IRQs 5 9 10 *11)
/var/log/messages-20201225:Dec 23 23:01:00 centos7vm kernel: ACPI: Using IOAPIC for interrupt routing
/var/log/messages-20201225:Dec 23 23:01:00 centos7vm kernel: ACPI: PCI Interrupt Link [LNKA] (IRQs 5 9 10 *11)
/var/log/messages-20201225:Dec 23 23:01:00 centos7vm kernel: ACPI: PCI Interrupt Link [LNKB] (IRQs 5 9 *10 11)
/var/log/messages-20201225:Dec 23 23:01:00 centos7vm kernel: ACPI: PCI Interrupt Link [LNKC] (IRQs 5 *9 10 11)
/var/log/messages-20201225:Dec 23 23:01:00 centos7vm kernel: ACPI: PCI Interrupt Link [LNKD] (IRQs 5 9 10 *11)
/var/log/messages-20201225:Dec 23 23:01:00 centos7vm kernel: BERT: Boot Error Record Table support is disabled. Enable it by using bert_enable as kernel parameter.
/var/log/messages-20201227:Dec 27 19:11:18 centos7vm kernel: ACPI: PCI Interrupt Link [LNKA] (IRQs 5 9 10 *11)
/var/log/messages-20201227:Dec 27 19:11:18 centos7vm kernel: ACPI: PCI Interrupt Link [LNKB] (IRQs 5 9 *10 11)
/var/log/messages-20201227:Dec 27 19:11:18 centos7vm kernel: ACPI: PCI Interrupt Link [LNKC] (IRQs 5 *9 10 11)
/var/log/messages-20201227:Dec 27 19:11:18 centos7vm kernel: ACPI: PCI Interrupt Link [LNKD] (IRQs 5 9 10 *11)
/var/log/messages-20201227:Dec 27 19:11:18 centos7vm kernel: BERT: Boot Error Record Table support is disabled. Enable it by using bert_enable as kernel parameter.
/var/log/messages-20201227:Dec 27 19:11:21 centos7vm kernel: [drm:vmw_host_log [vmwgfx]] *ERROR* Failed to send host log message.
/var/log/messages-20201227:Dec 27 19:11:21 centos7vm kernel: [drm:vmw_host_log [vmwgfx]] *ERROR* Failed to send host log message.
$
Из приведенного вывода
можно заметить, что grep печатает имя файла перед соответствующей строкой, чтобы
указать местонахождение шаблона.
2. Поиск без учета регистра
Grep предлагает искать
паттерн, не глядя на его регистр. Используйте флаг -i, чтобы утилита игнорировала регистр:
$ grep -i [pattern] [file]
Вывод:
        $ grep -i it text_file.txt
This is a sample text file. It contains
functionality. You can always use grep with any
kind of data but it works best with text data.
It supports numbers like 1, 2, 3 etc. as well as
This is a sample text file. It's repeated two times.
$
3. Поиск всего слова
Зачастую вместо
частичного совпадения необходимо полное соответствие поисковому слову. Это можно
сделать, используя флаг -w:
$ grep -w [pattern] [file]
Вывод:
        $ grep -w is text_file.txt
This is a sample text file. It contains
This is a sample text file. It's repeated two times.
$
4. Проверка количества совпадений
Иногда вместо
фактического совпадения со строкой нам необходимо количество успешных
совпадений, найденных grep. Этот результат можно получить, используя опцию -c:
$ grep -c [pattern] [file]
Вывод:
        $ grep -c is text_file.txt
2
$
5. Поиск в подкаталогах
Часто требуется выполнить
поиск файлов не только в текущем рабочем каталоге, но и в подкаталогах. Grep позволяет это сделать с помощью флага -r:
$ grep -r [pattern] *
Вывод:
        $ grep -r Hello *
dir1/file1.txt:Hello One
dir1/file2.txt:Hello Two
dir1/file3.txt:Hello Three
$
Как можно заметить,
grep проходит через каждый подкаталог внутри текущего каталога и перечисляет
файлы и строки, в которых найдено совпадение.
6. Инверсивный поиск
Если вы хотите найти
что-то несоответствующее заданному шаблону, grep и это умеет при помощи флага -v:
$ grep -v [pattern] [file]
Вывод:
        $ grep This text_file.txt
This is a sample text file. It contains
This is a sample text file. It's repeated two times.
$ grep -v This text_file.txt
several lines to be used as part of testing grep
functionality. You can always use grep with any
kind of data but it works best with text data.
It supports numbers like 1, 2, 3 etc. as well as
alphabets and special characters like - + * # etc.
$
Можно сравнить вывод
команды grep по одному и тому же шаблону и файлу с флагом -v или без него. С флагом печатается каждая строка, которая
не соответствует шаблону.
7. Печать номеров строк
Если хотите напечатать
номера найденных строк, чтобы узнать их позицию в файле, используйте
опцию -n:
$ grep -n [pattern] [file]
Вывод:
        $ grep -n This text_file.txt
1:This is a sample text file. It contains
7:This is a sample text file. It's repeated two times.
$
8. Ограниченный вывод
Для больших файлов вывод может быть огромным и тогда вам понадобится
фиксированное количество строк вместо всей простыни. Можно использовать —m[num]:
$ grep -m[num] [pattern] [file]
Обратите внимание, как
использование флага влияет на вывод для того же набора условий:
        $ grep It text_file.txt
This is a sample text file. It contains
It supports numbers like 1, 2, 3 etc. as well as
This is a sample text file. It's repeated two times.
$ grep -m2 It text_file.txt
This is a sample text file. It contains
It supports numbers like 1, 2, 3 etc. as well as
$
9. Отображение дополнительных строк
Иногда необходимо
вывести не только строки по некоторому шаблону, но и дополнительные строки выше
или ниже найденных для понимания контекста. Можно напечатать строку выше, ниже или оба варианта, используя флаги -A, -B или -C со значением num (количество дополнительных строк, которые будут напечатаны). Это применимо ко всем совпадениям, которые grep находит в указанном файле или в списке файлов.
$ grep -A[num] [pattern] [file]
или
$ grep -B[num] [pattern] [file]
или
$ grep -C[num] [pattern] [file]
Ниже показан обычный
вывод grep, а также вывод с флагами. Обратите внимание, как grep интерпретирует флаги и их значения, а также
изменения в соответствующих выходных данных:
- с флагом —A1 выведется 1 строка, следующая за основной;
- —B1 напечатает 1 строку перед основной;
- —C1 выведет по одной строке снизу и сверху.
        $ grep numbers text_file.txt
It supports numbers like 1, 2, 3 etc. as well as
$ grep -A1 numbers text_file.txt
It supports numbers like 1, 2, 3 etc. as well as
alphabets and special characters like - + * # etc.
$ grep -B1 numbers text_file.txt
kind of data but it works best with text data.
It supports numbers like 1, 2, 3 etc. as well as
$ grep -C1 numbers text_file.txt
kind of data but it works best with text data.
It supports numbers like 1, 2, 3 etc. as well as
alphabets and special characters like - + * # etc.
$
10. Список имен файлов
Чтобы напечатать только
имя файлов, в которых найден шаблон, используйте флаг -l:
$ grep -l [pattern] [file]
Вывод:
        $ grep -l su *.txt
file.txt
text_file.txt
$
11. Точный вывод строк
Если необходимо
напечатать строки, которые точно соответствуют заданному шаблону, а не какой-то
его части, применяйте в команде ключ -x:
$ grep -x [pattern] [file]
В приведенном ниже
примере file.txt содержится слово «support», а строки без точного совпадения
игнорируются.
        $ grep -x support *.txt
file.txt:support
$
12. Совпадение по началу строки
Используя регулярные
выражения, можно найти начало строки:
$ grep [options] "^[string]" [file]
Пример:
        $ grep It text_file.txt
This is a sample text file. It contains
It supports numbers like 1, 2, 3 etc. as well as
This is a sample text file. It's repeated two times.
$ grep ^It text_file.txt
It supports numbers like 1, 2, 3 etc. as well as
$
Обратите внимание, как
использование символа «^» изменяет выходные данные. Знак «^» указывает начало
строки, т.е. ^It соответствует любой
строке, начинающейся со слова It.
Заключение в кавычки может помочь, когда шаблон содержит пробелы и т. д.
13. Совпадение по концу строки
Эта полезная регулярка
способна помочь найти по шаблону конец строки:
$ grep [options] "[string]$" [file]
Пример:
        $ grep "." text_file.txt
This is a sample text file. It contains
functionality. You can always use grep with any
kind of data but it works best with text data.
It supports numbers like 1, 2, 3 etc. as well as
alphabets and special characters like - + * # etc.
This is a sample text file. It's repeated two times.
$ grep ".$" text_file.txt
kind of data but it works best with text data.
alphabets and special characters like - + * # etc.
This is a sample text file. It's repeated two times.
$
Обратите внимание, как
меняется вывод, когда мы сопоставляем символ «.» и когда используем «$», чтобы сообщить утилите о строках, заканчивающихся на «.» (без тех, которые могут содержать
символ посередине).
14. Файл шаблонов
Если у вас есть некий
список часто используемых шаблонов, укажите его в файле и используйте флаг -f. Файл должен содержать по одному шаблону на строку.
$ grep -f [pattern_file] [file_to_match]
В примере мы создали файл
шаблонов pattern.txt с таким содержанием:
        $ cat pattern.txt
This
It
$
Чтобы это использовать,
применяйте ключ -f:
        $ grep -f pattern.txt text_file.txt
This is a sample text file. It contains
It supports numbers like 1, 2, 3 etc. as well as
This is a sample text file. It's repeated two times.
$
15. Указание нескольких шаблонов
Grep позволяет указать
несколько шаблонов с помощью -e:
$ grep -e [pattern1] -e [pattern2] -e [pattern3]...[file]
Пример:
        $ grep -e is -e It -e to text_file.txt
This is a sample text file. It contains
several lines to be used as part of testing grep
It supports numbers like 1, 2, 3 etc. as well as
This is a sample text file. It's repeated two times.
$
Grep поддерживает
расширенные регулярные выражения или ERE (похожие на egrep) с использованием флага -E.
Использование ERE имеет
преимущество, когда вы хотите рассматривать мета-символы как есть и не хотите
заменять их строками. Использование -E
с grep эквивалентно команде egrep.
$ grep -E '[Extended RegEx]' [file]
Вот одно из применений
ERE, когда необходимо вывести строки, например, из больших конфигурационных
файлов. Здесь использовался флаг -v,
чтобы не печатать строки, соответствующие шаблону ^(#|$).
        $ sudo grep -vE '^(#|$)' /etc/ssh/sshd_config
HostKey /etc/ssh/ssh_host_rsa_key
HostKey /etc/ssh/ssh_host_ecdsa_key
HostKey /etc/ssh/ssh_host_ed25519_key
SyslogFacility AUTHPRIV
AuthorizedKeysFile      .ssh/authorized_keys
PasswordAuthentication yes
ChallengeResponseAuthentication no
GSSAPIAuthentication yes
GSSAPICleanupCredentials no
UsePAM yes
X11Forwarding yes
AcceptEnv LANG LC_CTYPE LC_NUMERIC LC_TIME LC_COLLATE LC_MONETARY LC_MESSAGES
AcceptEnv LC_PAPER LC_NAME LC_ADDRESS LC_TELEPHONE LC_MEASUREMENT
AcceptEnv LC_IDENTIFICATION LC_ALL LANGUAGE
AcceptEnv XMODIFIERS
Subsystem       sftp    /usr/libexec/openssh/sftp-server
$
Заключение
Приведенные выше
примеры – лишь верхушка айсберга. Grep поддерживает
целый ряд опций и может оказаться полезным инструментом в руках специалиста,
который способен эффективно его использовать. Мы можем не только взять на вооружение приведенные выше примеры, но и комбинировать их, чтобы получить требуемый
результат в различных условиях.
Для дальнейшего
изучения утилиты и расширения кругозора стоит почитать мануал, выполнив в
терминале команду man grep, или
посетить страницу с официальной документацией.
Дополнительные материалы:
- Настольные книги по Linux на русском языке
- 20 лучших инструментов для хакинга на Kali Linux
- 6 команд терминала и пара комбинаций, полезных для начинающих разработчиков
- 10 лучших видеокурсов для изучения Linux
- 7 книг по UNIX/Linux
Иногда может понадобится найти файл, в котором содержится определённая строка или найти строку в файле, где есть нужное слово. В Linux для этого существует несколько утилит, одна из самых используемых это grep. С её помощью можно искать не только строки в файлах, но и фильтровать вывод команд, и много чего ещё.
В этой инструкции мы рассмотрим что такое команда grep Linux, подробно разберём синтаксис и возможные опции grep, а также приведём несколько примеров работы с этой утилитой.
Что такое grep?
Название команды grep расшифровывается как «search globally for lines matching the regular expression, and print them». Это одна из самых востребованных команд в терминале Linux, которая входит в состав проекта GNU. До того как появился проект GNU, существовала утилита предшественник grep, тем же названием, которая была разработана в 1973 году Кеном Томпсоном для поиска файлов по содержимому в Unix. А потом уже была разработана свободная утилита с той же функциональностью в рамках GNU.
Grep дает очень много возможностей для фильтрации текста. Вы можете выбирать нужные строки из текстовых файлов, отфильтровать вывод команд, и даже искать файлы в файловой системе, которые содержат определённые строки. Утилита очень популярна, потому что она уже предустановлена прочти во всех дистрибутивах.
Синтаксис grep
Синтаксис команды выглядит следующим образом:
$ grep [опции] шаблон [/путь/к/файлу/или/папке…]
Или:
$ команда | grep [опции] шаблон
Здесь:
- Опции — это дополнительные параметры, с помощью которых указываются различные настройки поиска и вывода, например количество строк или режим инверсии.
- Шаблон — это любая строка или регулярное выражение, по которому будет выполняться поиск.
- Имя файла или папки — это то место, где будет выполняться поиск. Как вы увидите дальше, grep позволяет искать в нескольких файлах и даже в каталоге, используя рекурсивный режим.
Возможность фильтровать стандартный вывод пригодится, например, когда нужно выбрать только ошибки из логов или отфильтровать только необходимую информацию из вывода какой-либо другой утилиты.
Опции
Давайте рассмотрим самые основные опции утилиты, которые помогут более эффективно выполнять поиск текста в файлах grep:
- -E, —extended-regexp — включить расширенный режим регулярных выражений (ERE);
- -F, —fixed-strings — рассматривать шаблон поиска как обычную строку, а не регулярное выражение;
- -G, —basic-regexp — интерпретировать шаблон поиска как базовое регулярное выражение (BRE);
- -P, —perl-regexp — рассматривать шаблон поиска как регулярное выражение Perl;
- -e, —regexp — альтернативный способ указать шаблон поиска, опцию можно использовать несколько раз, что позволяет указать несколько шаблонов для поиска файлов, содержащих один из них;
- -f, —file — читать шаблон поиска из файла;
- -i, —ignore-case — не учитывать регистр символов;
- -v, —invert-match — вывести только те строки, в которых шаблон поиска не найден;
- -w, —word-regexp — искать шаблон как слово, отделенное пробелами или другими знаками препинания;
- -x, —line-regexp — искать шаблон как целую строку, от начала и до символа перевода строки;
- -c — вывести количество найденных строк;
- —color — включить цветной режим, доступные значения: never, always и auto;
- -L, —files-without-match — выводить только имена файлов, будут выведены все файлы в которых выполняется поиск;
- -l, —files-with-match — аналогично предыдущему, но будут выведены только файлы, в которых есть хотя бы одно вхождение;
- -m, —max-count — остановить поиск после того как будет найдено указанное количество строк;
- -o, —only-matching — отображать только совпавшую часть, вместо отображения всей строки;
- -h, —no-filename — не выводить имя файла;
- -q, —quiet — не выводить ничего;
- -s, —no-messages — не выводить ошибки чтения файлов;
- -A, —after-content — показать вхождение и n строк после него;
- -B, —before-content — показать вхождение и n строк после него;
- -C — показать n строк до и после вхождения;
- -a, —text — обрабатывать двоичные файлы как текст;
- —exclude — пропустить файлы имена которых соответствуют регулярному выражению;
- —exclude-dir — пропустить все файлы в указанной директории;
- -I — пропускать двоичные файлы;
- —include — искать только в файлах, имена которых соответствуют регулярному выражению;
- -r — рекурсивный поиск по всем подпапкам;
- -R — рекурсивный поиск включая ссылки;
Все самые основные опции рассмотрели, теперь давайте перейдём к примерам работы команды grep Linux.
Примеры использования grep
Давайте перейдём к практике. Сначала рассмотрим несколько основных примеров поиска внутри файлов Linux с помощью grep.
1. Поиск текста в файле
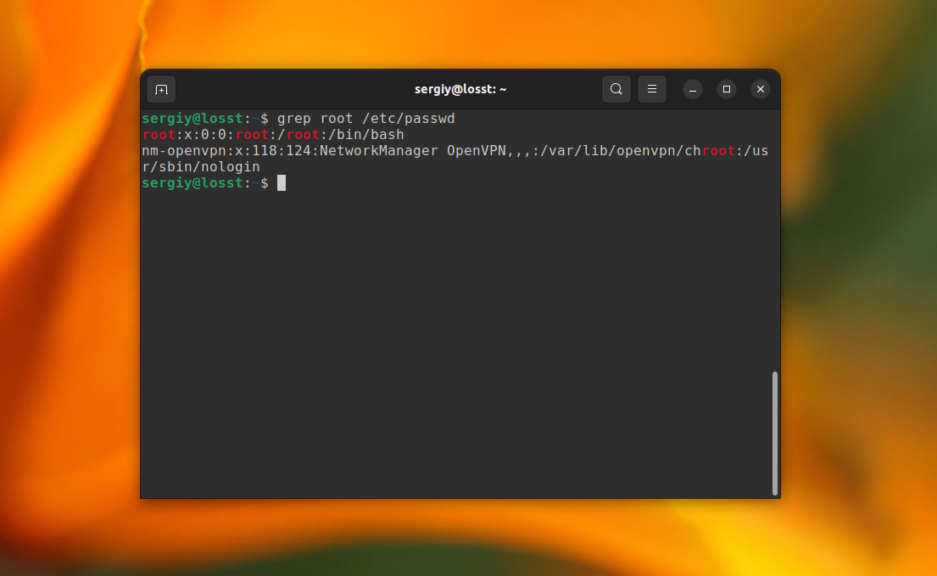
В первом примере мы будем искать информацию о пользователе root в файле со списком пользователей Linux /etc/passwd. Для этого выполните следующую команду:
grep root /etc/passwd
В результате вы получите что-то вроде этого:
С помощью опции -i можно указать, что регистр символов учитывать не нужно. Например, давайте найдём все строки содержащие вхождение слова time в том же файле:
grep -i "time" /etc/passwd
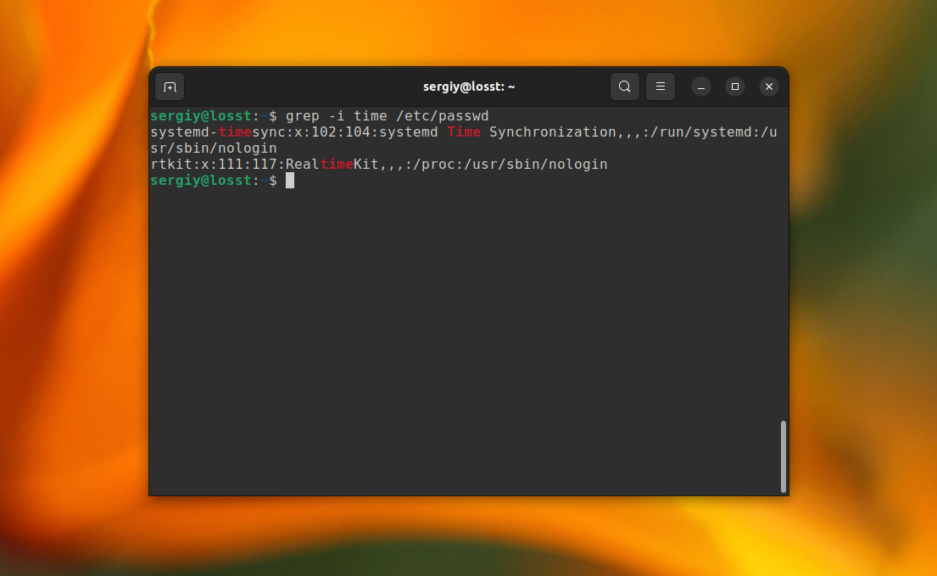
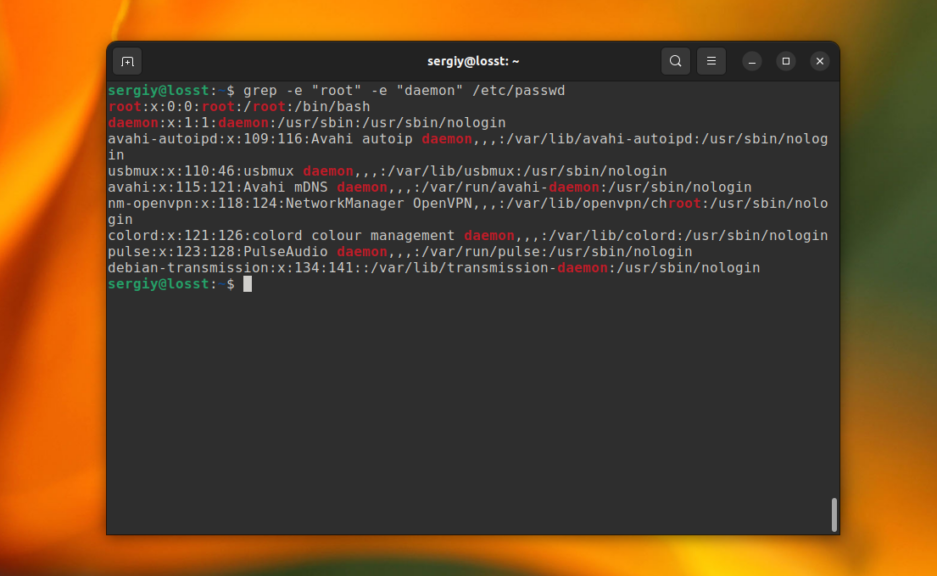
В этом случае Time, time, TIME и другие вариации слова будут считаться эквивалентными. Ещё, вы можете указать несколько условий для поиска, используя опцию -e. Например:
grep -e "root" -e "daemon" /etc/passwd
C помощью опции -n можно выводить номер строки, в которой найдено вхождение, например:
grep -n 'root' /etc/passwd

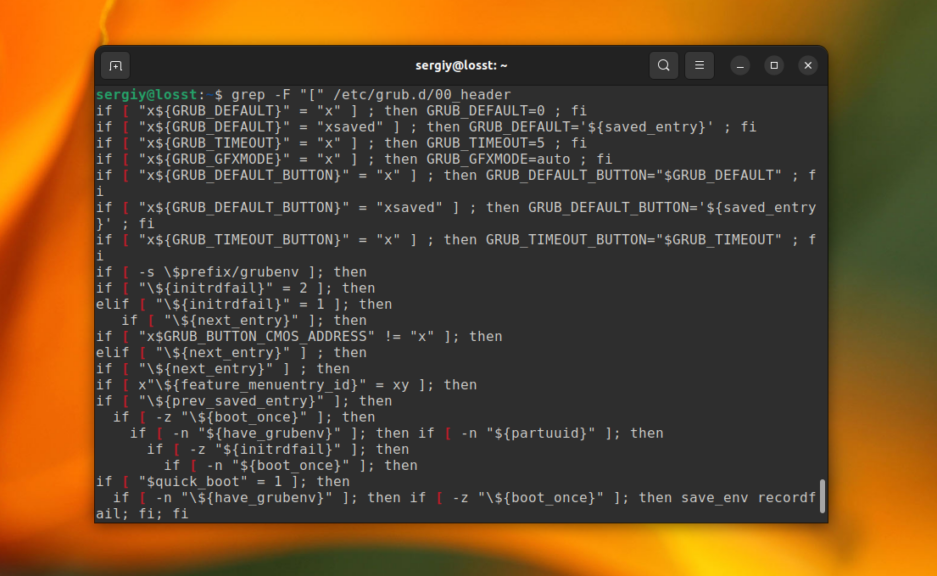
Это всё хорошо работает пока ваш поисковый запрос не содержит специальных символов. Например, если вы попытаетесь найти все строки, которые содержат символ «[» в файле /etc/grub/00_header, то получите ошибку, что это регулярное выражение не верно. Для того чтобы этого избежать, нужно явно указать, что вы хотите искать строку с помощью опции -F:
grep -F "[" /etc/grub.d/00_header
Теперь вы знаете как выполняется поиск текста файлах grep.
2. Фильтрация вывода команды
Для того чтобы отфильтровать вывод другой команды с помощью grep достаточно перенаправить его используя оператор |. А файл для самого grep указывать не надо. Например, для того чтобы найти все процессы gnome можно использовать такую команду:
ps aux | grep "gnome"
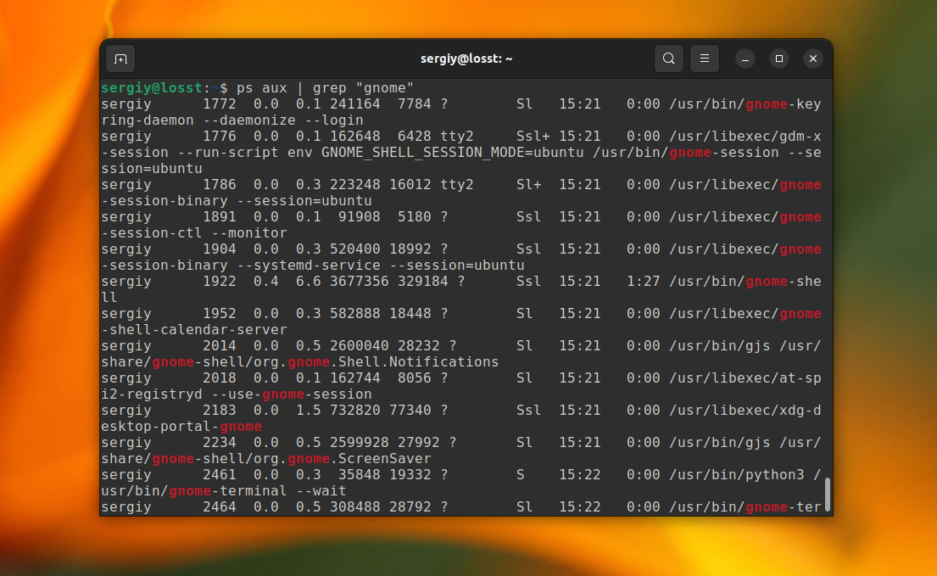
В остальном всё работает аналогично.
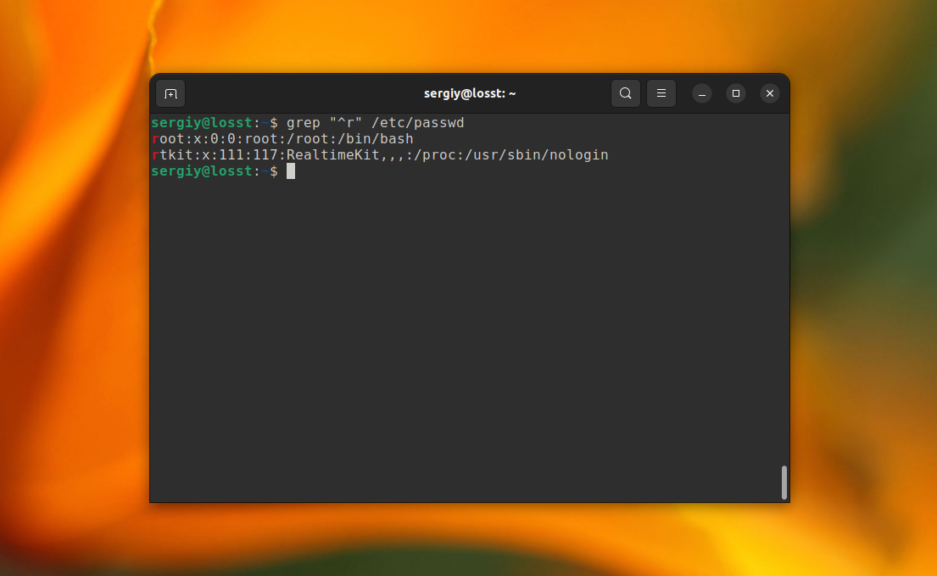
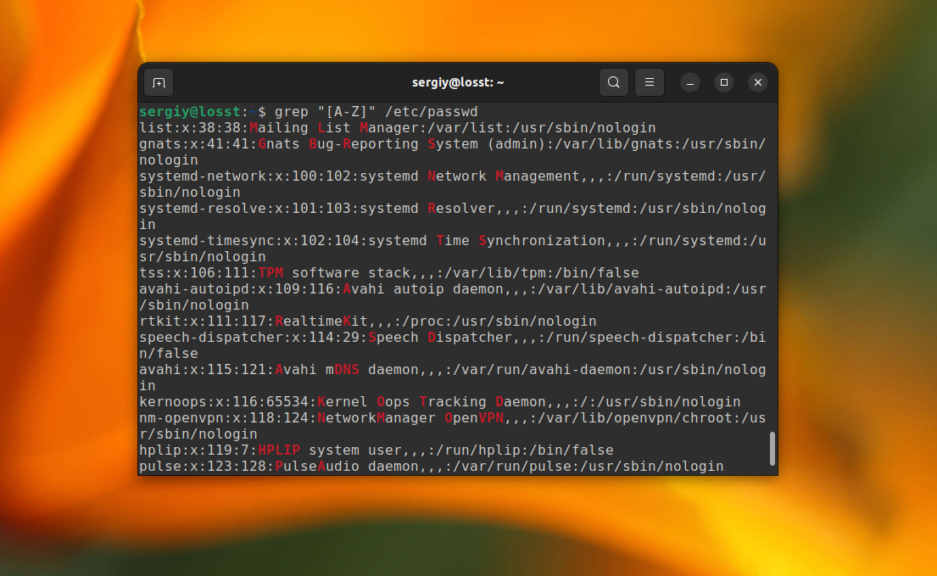
3. Базовые регулярные выражения
Утилита grep поддерживает несколько видов регулярных выражений. Это базовые регулярные выражения (BRE), которые используются по умолчанию и расширенные (ERE). Базовые регулярные выражение поддерживает набор символов, позволяющих описать каждый определённый символ в строке. Это: ., *, [], [^], ^ и $. Например, вы можете найти строки, которые начитаются на букву r:
grep "^r" /etc/passwd
Или же строки, которые содержат большие буквы:
grep "[A-Z]" /etc/passwd
А так можно найти все строки, которые заканчиваются на ready в файле /var/log/dmesg:
grep "ready$" /var/log/dmesg
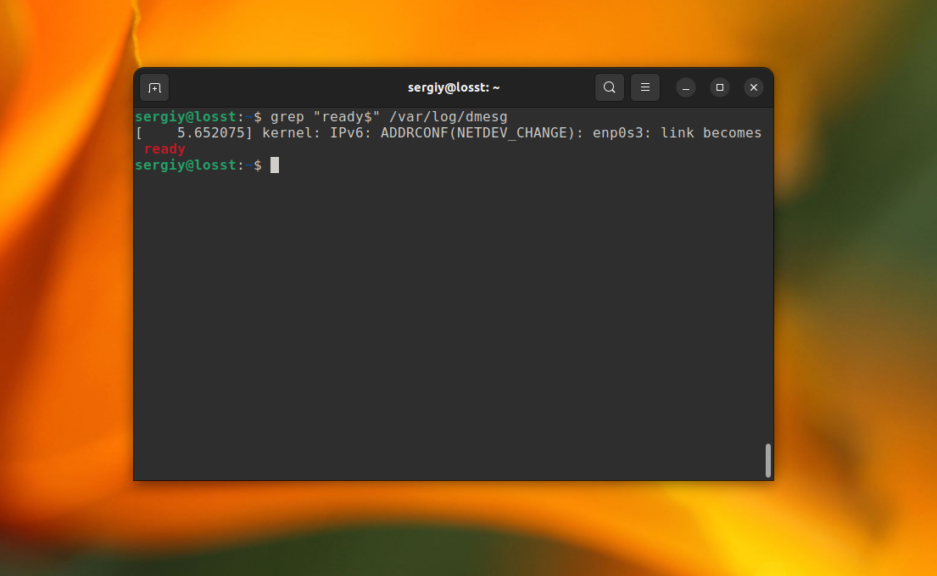
Но используя базовый синтаксис вы не можете указать точное количество этих символов.
4. Расширенные регулярные выражения
В дополнение ко всем символам из базового синтаксиса, в расширенном синтаксисе поддерживаются также такие символы:
- + — одно или больше повторений предыдущего символа;
- ? — ноль или одно повторение предыдущего символа;
- {n,m} — повторение предыдущего символа от n до m раз;
- | — позволяет объединять несколько паттернов.
Для активации расширенного синтаксиса нужно использовать опцию -E. Например, вместо использования опции -e, можно объединить несколько слов для поиска вот так:
grep -E "root|daemon" /etc/passwd

Вообще, регулярные выражения grep — это очень обширная тема, в этой статье я лишь показал несколько примеров. Как вы увидели, поиск текста в файлах grep становиться ещё эффективнее. Но на полное объяснение этой темы нужна целая статья, поэтому пока пропустим её и пойдем дальше.
5. Вывод контекста
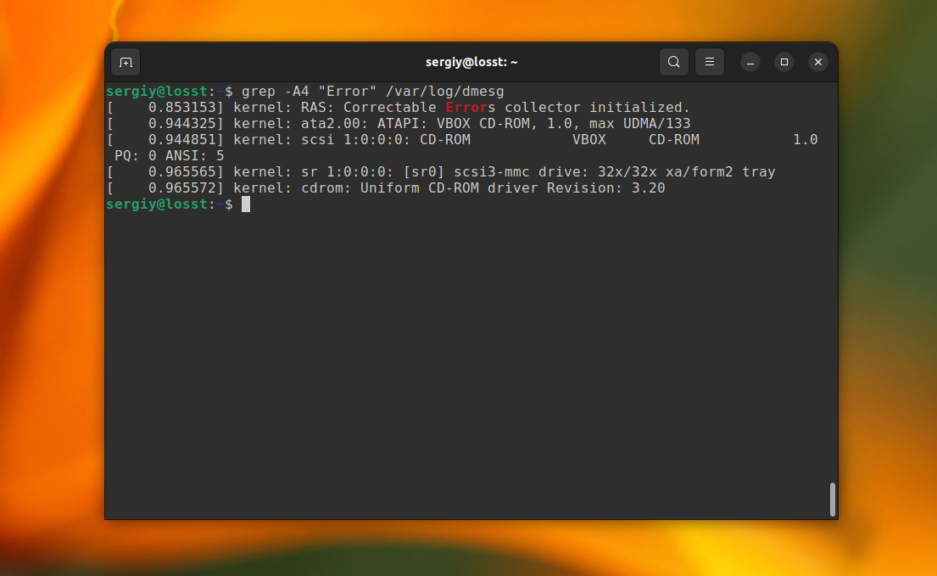
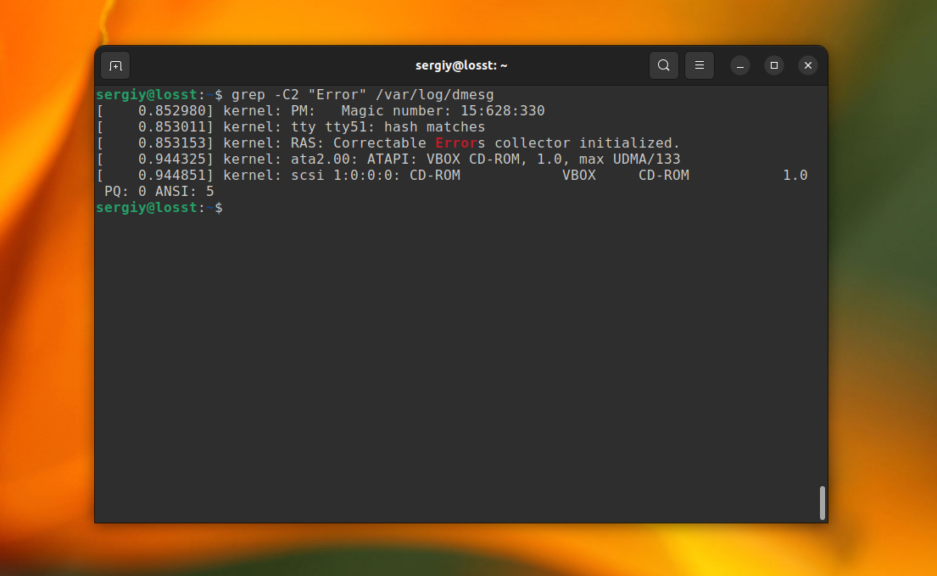
Иногда бывает очень полезно вывести не только саму строку со вхождением, но и строки до и после неё. Например, мы хотим выбрать все ошибки из лог-файла, но знаем, что в следующей строчке после ошибки может содержаться полезная информация, тогда с помощью grep отобразим несколько строк. Ошибки будем искать в /var/log/dmesg по шаблону «Error»:
grep -A4 "Error" /var/log/dmesg
Выведет строку с вхождением и 4 строчки после неё:
grep -B4 "Error" /var/log/dmesg
Эта команда выведет строку со вхождением и 4 строчки до неё. А следующая выведет по две строки с верху и снизу от вхождения.
grep -C2 "Error" /var/log/dmesg
6. Рекурсивный поиск в grep
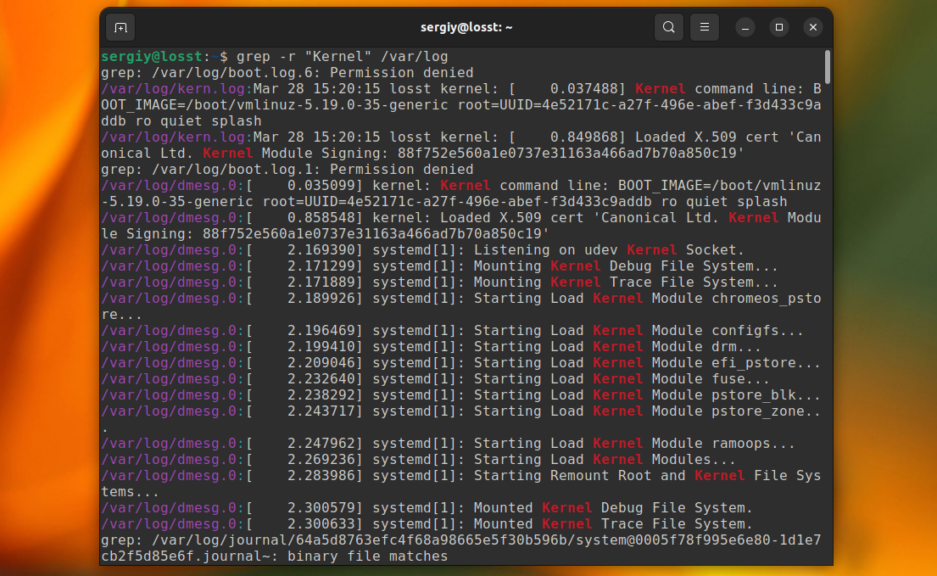
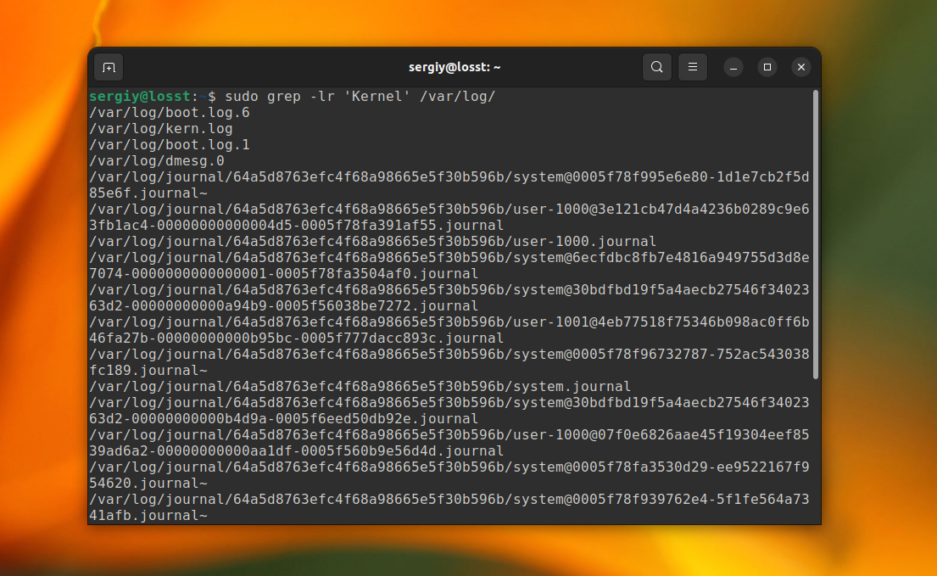
До этого мы рассматривали поиск в определённом файле или выводе команд. Но grep также может выполнить поиск текста в нескольких файлах, размещённых в одном каталоге или подкаталогах. Для этого нужно использовать опцию -r. Например, давайте найдём все файлы, которые содержат строку Kernel в папке /var/log:
grep -r "Kernel" /var/log
Папка с вашими файлами может содержать двоичные файлы, в которых поиск выполнять обычно не надо. Для того чтобы их пропускать используйте опцию -I:
grep -rI "Kernel" /var/log
Некоторые файлы доступны только суперпользователю и для того чтобы выполнять по ним поиск вам нужно запускать grep с помощью sudo. Или же вы можете просто скрыть сообщения об ошибках чтения и пропускать такие файлы с помощью опции -s:
grep -rIs "Kernel" /var/log
7. Выбор файлов для поиска
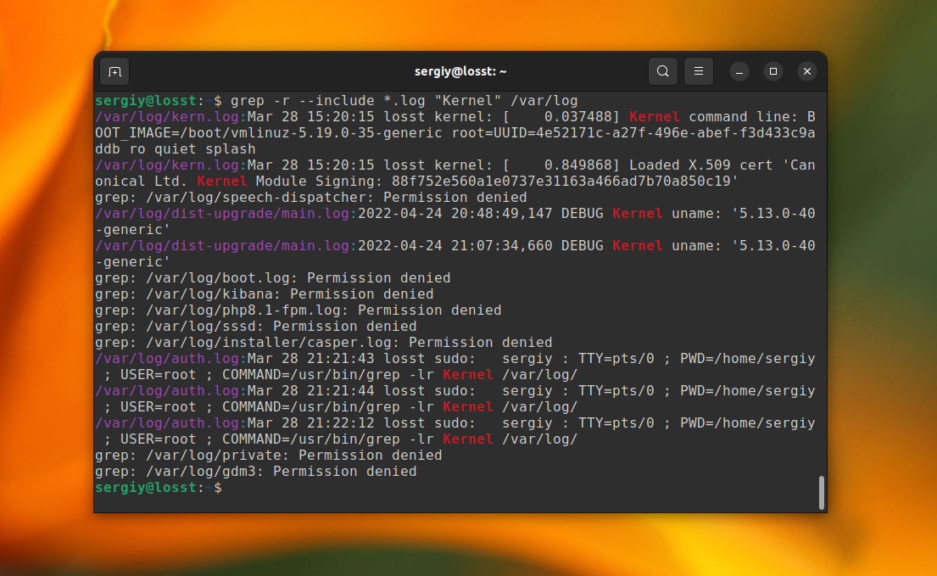
С помощью опций —include и —exclude вы можете фильтровать файлы, которые будут принимать участие в поиске. Например, для того чтобы выполнить поиск только по файлам с расширением .log в папке /var/log используйте такую команду:
grep -r --include="*.log" "Kernel" /var/log
А для того чтобы исключить все файлы с расширением .journal надо использовать опцию —exclude:
grep -r --exclude="*.journal" "Kernel" /var/log
8. Поиск слов в grep
Когда вы ищете строку abc, grep будет выводить также kbabc, abc123, aafrabc32 и тому подобные комбинации. Вы можете заставить утилиту искать по содержимому файлов в Linux строки, которые включают только искомые слова полностью с помощью опции -w. Например:
grep -w "root" /etc/passwd

9. Количество строк
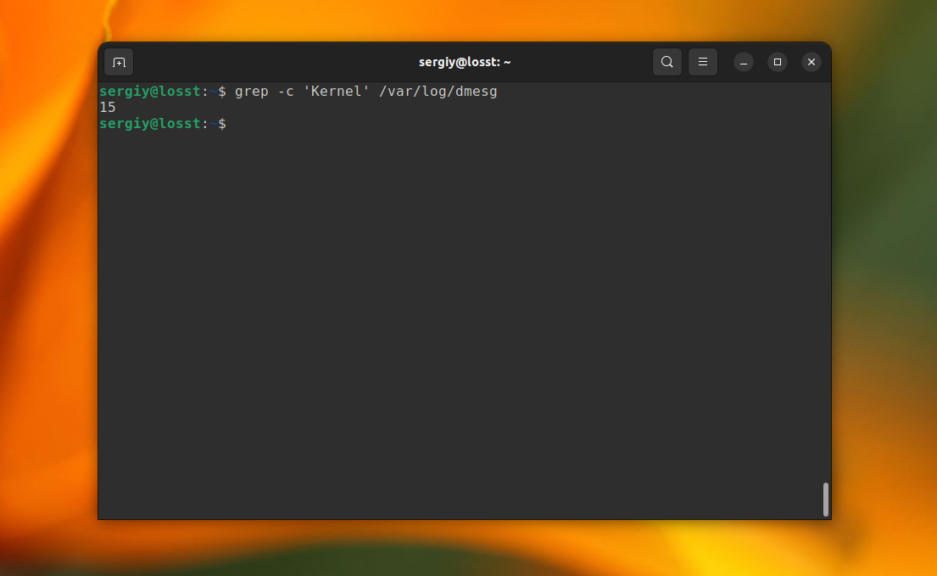
Утилита grep может сообщить, сколько строк с определенным текстом было найдено файле. Для этого используется опция -c (счетчик). Например:
grep -c 'Kernel' /var/log/dmesg
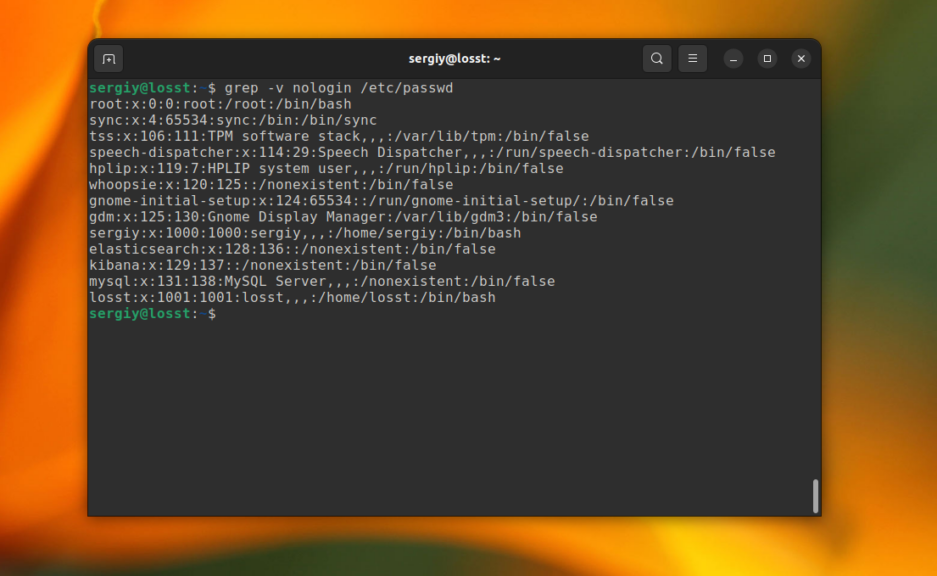
10. Инвертированный поиск
Команда grep Linux может быть использована для поиска строк, которые не содержат указанное слово. Например, так можно вывести только те строки, которые не содержат слово nologin:
grep -v nologin /etc/passwd
11. Вывод имен файлов
Вы можете указать grep выводить только имена файлов, в которых было хотя бы одно вхождение с помощью опции -l. Например, следующая команда выведет все имена файлов из каталога /var/log, при поиске по содержимому которых было обнаружено вхождение Kernel:
grep -lr 'Kernel' /var/log/
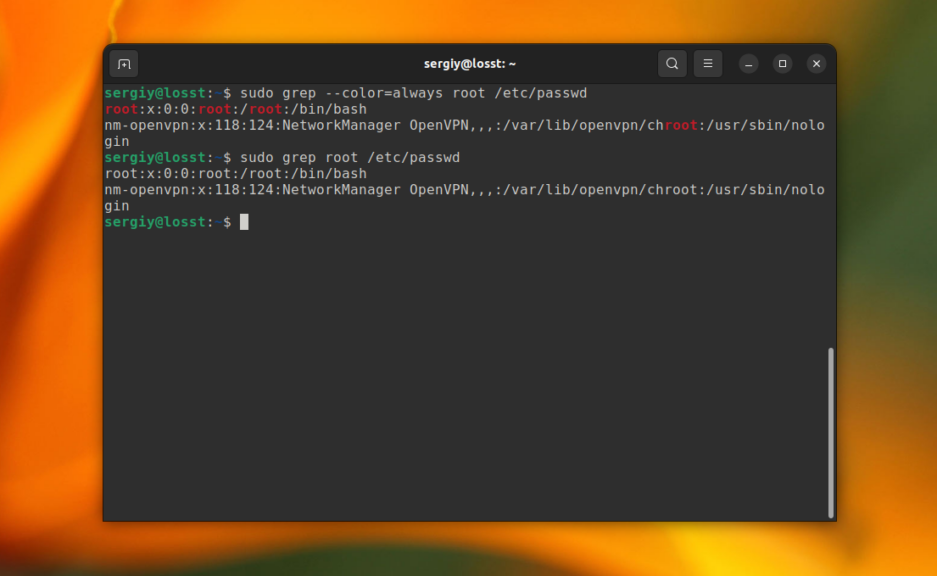
12. Цветной вывод
По умолчанию grep не будет подсвечивать совпадения цветом. Но в большинстве дистрибутивов прописан алиас для grep, который это включает. Однако, когда вы используйте команду c sudo это работать не будет. Для включения подсветки вручную используйте опцию —color со значением always:
sudo grep --color=always root /etc/passwd
Получится:
Выводы
Вот и всё. Теперь вы знаете что представляет из себя команда grep Linux, а также как ею пользоваться для поиска файлов и фильтрации вывода команд. При правильном применении эта утилита станет мощным инструментом в ваших руках. Если у вас остались вопросы, пишите в комментариях!
Обнаружили ошибку в тексте? Сообщите мне об этом. Выделите текст с ошибкой и нажмите Ctrl+Enter.

Статья распространяется под лицензией Creative Commons ShareAlike 4.0 при копировании материала ссылка на источник обязательна .
Posted:
September 23, 2022
Searching for patterns of text in files or text streams is one of the most common tasks you’ll perform in your sysadmin career. This is a valuable skill that allows you to check a variety of system configurations, analyze data, troubleshoot logs, and perform many other activities.
The most common way to find text in a Linux system is using the command-line utility grep. This utility was originally developed for the Unix operating system in the early 1970s. Grep evolved over the years, and the most common version available today for Linux, GNU grep, has additional features such as colored output. However, its main functionality is still the same.
Using grep, you can quickly find text matching a regular expression in a single file, a group of files, or text coming from stdin using the shell pipe operator.
This article covers how to use the grep command to find text.
Find text in a file
The most basic way to use grep is searching for text in a single file. To do this, type grep followed by the text pattern to search for and the file name to search in. For example, to find which port the Secure Shell (SSH) daemon uses, search for Port in file /etc/ssh/sshd_config:
$ grep Port /etc/ssh/sshd_config
Port 22
#GatewayPorts no
Notice that grep finds all lines that match the text pattern regardless of where the pattern is located.
[ Download the Linux grep command cheat sheet. ]
Extend grep with regular expressions
In the previous example, when you searched for Port in the SSH configuration file, grep returned two lines. The line you were looking for, Port 22, and an additional line containing the search pattern. In some cases, that’s exactly what you want. In other cases, grep could find too many entries that you’re not interested in, requiring you to sort through them to find the desired information.
To avoid that, you can use regular expressions to be more specific about what you’re looking for. For example, to find only lines that start with the word Port, you can use the regular expression operator ^, like this:
$ grep ^Port /etc/ssh/sshd_config
Port 22
This time grep returned only the line that started with Port since, in the second line, the expression Port is in the middle.
You can also use extended regular expressions with the command-line parameter -E. For example, to search for a pattern that contains the word Port followed by numbers, use this regular expression:
$ grep -E "Port [1-9]+" /etc/ssh/sshd_config
Port 22
You can also look for lines that end with a text pattern by using the $ operator. For example, to find all lines that end with none in sshd_config, use grep like this:
$ grep none$ /etc/ssh/sshd_config
#RekeyLimit default none
#AuthorizedPrincipalsFile none
#AuthorizedKeysCommand none
#ChrootDirectory none
#VersionAddendum none
#Banner none
Regular expressions are a big part of grep, making it powerful and flexible. However, regular expressions are a huge topic. For additional information, look at Regular expression on Wikipedia or Regular expressions 101.
Find text in multiple files and directories
Similar to finding text patterns in a single file, you can use grep to find text in multiple files or directories. To find text in multiple files simultaneously, specify which files to search from after the first file name, or use a shell wildcard such as * for all files. For example, to search for a configuration in two files:
$ grep Port /etc/ssh/sshd_config /etc/ssh/ssh_config
/etc/ssh/sshd_config:Port 22
/etc/ssh/sshd_config:#GatewayPorts no
/etc/ssh/ssh_config:#   Port 22
When you use multiple files, grep shows the name of the file where it found a match before showing the matched line.
[ Keep your most commonly used commands handy with the Linux commands cheat sheet. ]
To run the search recursively in multiple subdirectories, use the command line flag -R:
$ grep -R ^Port /etc
/etc/ssh/sshd_config:Port 22
The grep command is fast and returns results quickly, but it may take a long time if you specify too many files or subdirectories to search.
Find text in another command’s output
Similar to other Unix utilities, grep also acts on stdin when you pipe the output of another command into it. This is a fast and useful way to filter a command’s output to match the text pattern you’re looking for.
For example, if you want to check whether the package openssh is installed in your Fedora or Red Hat Enterprise Linux (RHEL) operating system, you can pipe the output of command rpm -qa, which lists all installed packages, into grep to search for the pattern:
$ rpm -qa | grep ssh
libssh-config-0.9.6-4.fc36.noarch
libssh-0.9.6-4.fc36.x86_64
openssh-8.8p1-1.fc36.1.x86_64
You can filter long command outputs with grep, making finding useful information easier.
[ Get the guide to installing applications on Linux. ]
Additional useful options
The grep command provides many options to change how it searches for patterns or displays results. So far in this article, you’ve seen some of them. While I can’t list all options, here are some other useful examples:
-
Use option
-ifor a case-insensitive search. - Use option
-vto invert the search and display lines that do not match the pattern. - Use option
-wto search for entire words only instead of patterns in the middle of other words. - Use option
--colorfor colored output, making it easier to spot the matched pattern.
For a complete list of grep options, consult the man pages.
What’s next?
The GNU grep utility is flexible and useful, helping you accomplish many tasks in your daily sysadmin activities. The more you use grep, the more comfortable you will become, and soon you’ll notice you’re relying on it all the time.
For more information about grep, look at some of these links:
- How to use grep
- Linux grep command cheat sheet
- Grep wiki
- Grep manual at GNU
You can also find more information about grep in your Linux system by using man grep or quick, valuable examples with the tldr tool.
Last updated on: 2021-07-23
Authored by: Coral Moore
This article introduces some tools, especially grep, a Linux® command-line
tool that you can use to search directories or files that match specified
regular expressions.
What is grep?
Official answer:
grep searches the named input files (or standard input if you don’t
specify a file or use a single hyphen (—) as the filename)
for lines containing a match to the given pattern. By default, grep
prints the matching lines.
Nicer answer:
Search a file, directory, or output for something specific, similar to
Ctrl + f in Windows®. Use this function to target exactly
what you need.
Basics
Often, the easiest way to show how a command works, is with examples.
You can see all users in the /etc/passwd file with the following command:
# cat /etc/passwd
rack❌1001:1001::/home/rack:/bin/bash
apache❌48:48:Apache:/usr/share/httpd:/sbin/nologin
mysql❌27:27:MariaDB Server:/var/lib/mysql:/sbin/nologin
sher❌1002:1002::/home/sher:/bin/bash
Using grep, you can narrow down that list to find a single user.
Find a specific user:
List the users but filter the output showing only the line with sher in it.
# cat /etc/passwd | grep 'sher'
sher❌1002:1002::/home/sher:/bin/bash
Or, find the same user with a single command:
# grep 'sher' /etc/passw
rack❌1001:1001::/home/rack:/bin/bash
sher❌1002:1002::/home/sher:/bin/bash
In the following example, find all users with bash access:
# grep 'bash' /etc/passwd
rack❌1001:1001::/home/rack:/bin/bash
sher❌1002:1002::/home/sher:/bin/bash
Flags
Like most Linux commands, grep uses flags, usually one or more
letters preceded by one or more dashes, to add extra functionality.
-v: Show everything that does not include the specified
search pattern:
# grep -v 'nologin' /etc/passwd
rack❌1001:1001::/home/rack:/bin/bash
sher❌1002:1002::/home/sher:/bin/bash
-i: Show matches, ignoring the case, which is useful when
you don’t know exactly what you need:
# grep -i 'SHER' /etc/passwd
sher❌1002:1002::/home/sher:/bin/bash
Search for multiple patterns
grep uses the pipe symbol (|) to mean or allowing you to search
for more than one thing at a time. Use one of the following methods
to search for several things at once:
: Escapes the next character, a pipe (|) allowing it to work as or:
# grep 'sher|rack' /etc/passwd
rack❌1001:1001::/home/rack:/bin/bash
sher❌1002:1002::/home/sher:/bin/bash
-E: Interprets special characters, such as | as or:
# grep -E 'sher|rack' /etc/passwd
rack❌1001:1001::/home/rack:/bin/bash
sher❌1002:1002::/home/sher:/bin/bash
The egrep command does the same thing:
# egrep 'sher|rack' /etc/passwd
rack❌1001:1001::/home/rack:/bin/bash
sher❌1002:1002::/home/sher:/bin/bash
Combining flags
You can use various flags in combination to refine a search.
The following example shows all users who aren’t sher or rack,
regardless of the case of the pattern of file content:
# egrep -vi 'SHER|RACK' /etc/passwd
Practical examples
The following sections cover other uses for grep and introduce other useful commands.
In Linux, you comment out lines by adding the pound symbol (#) at the
beginning of the line. This way, you can add your own notes, and scripts or programs
ignore the comments and do not execute those lines.
To display files ignoring those comments, use tbe following command:
You can even run a grep on top of another grep command.
For example, list a file ignoring commented lines, and then look for something specific:
# grep -v ^'#' /file | grep 'hello'
Search history
Most Linux systems keep a log of executed commands, which you can access with
the command history. When you combine history with grep, you can very
effectively investigate what has been run on your system so far.
Check the passwd commands run and other commands containing the
passwd pattern:
# history | grep 'passwd'
Find commands run on a specific day:
# history | grep '2021-05-10'
Check which commands ran at a specific time:
# history | grep '2021-05-10 11:00:'
Check ports and root login
List the web traffic running on ports 80 and 443:
# netstat -plnt | egrep '80|443'
You can use ^ in a grep command to show only those lines
starting with your search pattern.
For example, run the following command to check whether the system allows
root logins:
# grep ^'Permit' /etc/ssh/sshd_config
Search logs with head and tail
Use top to show the first ten lines of the login attempts log:
Use tail to show the lines at the end of the login attempts log:
Use the last command to show the first ten lines of the most recent logins:
Use the tail -f to watch a file grow in real time. For example, you can see
the most recent login attempts and watch ongoing attempts. If someone tries to
log in, you can see it as it happens with the following command:
# tail -f /var/log/secure
Ctrl + C to exit
Other tools
You can experiment with your newfound skills by using the tools in this section.
vim or nano
vi, vim, and nano are the most common text editors in Linux.
You can use them to edit a file, similar to using Notepad in Windows.
Open up and create a new file, test:
| Actions | Key sequence | Explanation |
|---|---|---|
| To start typing new content: | i |
Prepare to insert text |
| To exit without saving: | Esc :q! |
Escape insert mode and quit |
| To exit and save: | Esc :wq! |
Escape insert mode, write, and quit |
echo
echo is a simple command that tells Linux to repeat what you just typed.
This is effective for testing grep commands without first creating a new file.
For example, make hello display:
Display hello and search for the middle letters:
# echo 'hello' | grep 'ell'
hello
You can even use echo to display multiple lines by using -e and n to
add new lines.
Display hi and ho on separate lines:
Display hi and ho on separate lines and search for hi:
# echo -e 'hinho' | grep 'hi'
hi
sed
Like grep, sed has many uses, but you primarily use this command to
search for and replace specified content. Here are some basic examples of how
to single out specific lines:
First, Use vim to create a file:
When the editor opens, enter the following lines:
Display the new file:
# cat test
1 Hi
2 How
3 Are
4 You
Use sed to return everything except the first line:
# sed 1d test
2 How
3 Are
4 You
Return only the first line:
or
Return only the second to fourth lines:
# sed '2,4!d' test
2 How
3 Are
4 You
Conclusion
There are many other tools that you can use, such as awk, cut, sort, xargs,
and so on. Now that you know how to create a file by using echo, you can
experiment more effectively with them.