PHP
YouTube API Key (Получение + Пример)
Дата размещения статьи 17/06/2022 👁3618
YouTube API Key (Получение + Пример)
API YouTube — это интерфейс, который позволяет встраивать видео, создавать списки воспроизведения и предлагать другие функции YouTube на вашем веб-сайте. Это помогает компаниям предлагать расширенные функции обмена видео на своем веб-сайте или в приложении без необходимости писать код с нуля.
Содержание:
- Данные API YouTube.
- Получение ключа API.
- Вход в Google Cloud Platform.
- Создание нового проекта.
- Добавление библиотеки YouTube Data API v3.
- Создание учетной записи и получение ключа.
- Пример.
- F.A.Q.
Как и другие API (интерфейсы программирования приложений), API YouTube упрощает работу программиста, пропуская рутинную работу по написанию каждой строки кода каждый раз, когда пользователям требуется доступ к данным. Вместо этого программисты могут использовать предопределенные функции и протоколы для подбора видео YouTube на веб-сайте.
Кроме того, API YouTube имеет широкий набор функций, которые делают его доступным для разработчиков и ценным для бизнеса. Это позволяет вам извлекать данные в массовом масштабе без необходимости доступа к отдельным видео и каналам.
Так какие данные вы можете использовать с помощью YouTube API? Давайте взглянем.
Данные API YouTube
API YouTube предоставляет вам доступ к данным YouTube более полным и масштабируемым способом, чем отдельные коды для встраивания YouTube. Вы можете получать целые плейлисты, загрузки пользователей и даже результаты поиска с помощью API YouTube. Вы также можете добавить функции YouTube на свой веб-сайт, чтобы пользователи могли загружать видео и управлять подпиской на канал прямо с вашего веб-сайта или приложения.
Давайте рассмотрим некоторые из наиболее популярных функций API. Это не весь список; рекомендую ознакомиться с официальной документацией Google.
| Цель использования API |
Пример HTTP-запроса |
Действие на вашем сайте или приложении |
|---|---|---|
| Поиск YouTube | GET / search | Извлечение ряда результатов поиска на основе заданного вами запроса |
| Плейлисты YouTube | DELETE / playlists | Удаление плейлиста |
| Видео YouTube | GET / videos | Получение информации о нужном(-ых) видео на YouTube с вашего веб-сайта или приложения |
| Комментарии YouTube | POST / comments | Позволяет пометить один или несколько комментариев как спам |
| Каналы YouTube | GET / channels | Извлечение видео или плейлистов канала (или любой другой ресурс, например комментарии) |
| Подписки YouTube | POST / subscriptions | Добавление подписчика на канал |
| Подписчики YouTube Канала | GET / members | Получение списка участников канала, который дал вам разрешение |
| Разделы YouTube | POST / channelSections | Позволяет добавить раздел рекомендуемых видео |
| Водяные знаки YouTube | POST / watermarks / unset | Позволяет удалить изображение водяного знака, связанное с каналом |
Как получить API-ключ YouTube
Чтобы получить API YouTube:
- Войдите в консоль разработчиков Google.
- Создайте новый проект.
- На панели инструментов нового проекта нажмите Explore & Enable APIs.
В библиотеке перейдите к YouTube Data API v3 в разделе YouTube API. - Включите API.
- Создайте учетную запись.
- Появится экран с ключом API.
1. Вход в консоль разработчиков Google
Вы можете войти в Google Cloud Platform, используя свою учетную запись Google.
Если у вас её еще нет, вам нужно создать учётную запись.
2. Создание нового проекта
Как только вы войдете в систему, вы автоматически попадете на пустую панель инструментов. В правом верхнем углу нажмите Create Project.
Вы попадете на экран, где вы можете добавить название проекта, выбрать свою организацию и выбрать местоположение (URL).
Вы можете создать проект без организации. Если у вас нет организации, вам не будет предложено выбрать местоположение.
После создания проекта всё, что вы сделаете с этого момента, включая создание ключа API, будет применяться к этому конкретному проекту. Если у вас одновременно запущено несколько проектов, убедитесь, что выбран правильный, дважды проверив, что проект указан на верхней панели навигации.
3. YouTube Data API v3
После создания проекта можно добавлять любую необходимую API библиотеку.
Для этого нажмите сверху ENABLE APIS AND SERVICES или в левом меню (сайдбаре) нажмите Library.
Выполните поиск, введя YouTube Data API v3.

Выберите его и нажмите Enable для активации.
4. Создание учетной записи
После нажатия кнопки Enable вы попадете на страницу обзора данного API.
На данной странице вы можете отслеживать запросы, квоту, а также добавить учетные данные
Создать учётные данные можно во вкладке Credentials на данной странице (или такую же ссылку в сайдбаре).
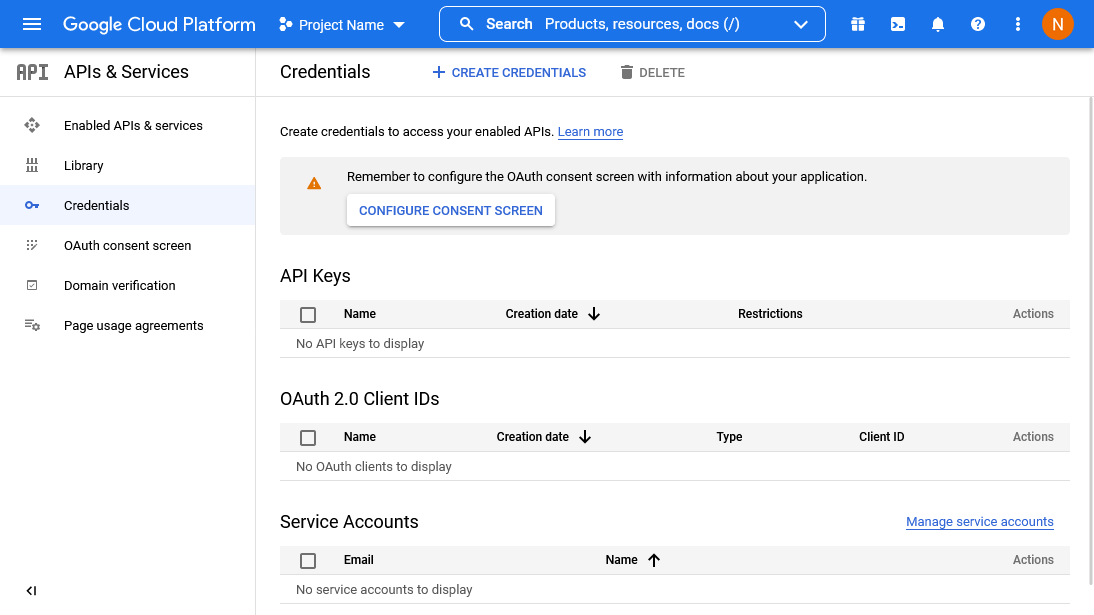
Вверху нажмите Create credentials » API key. Ключ API создан.
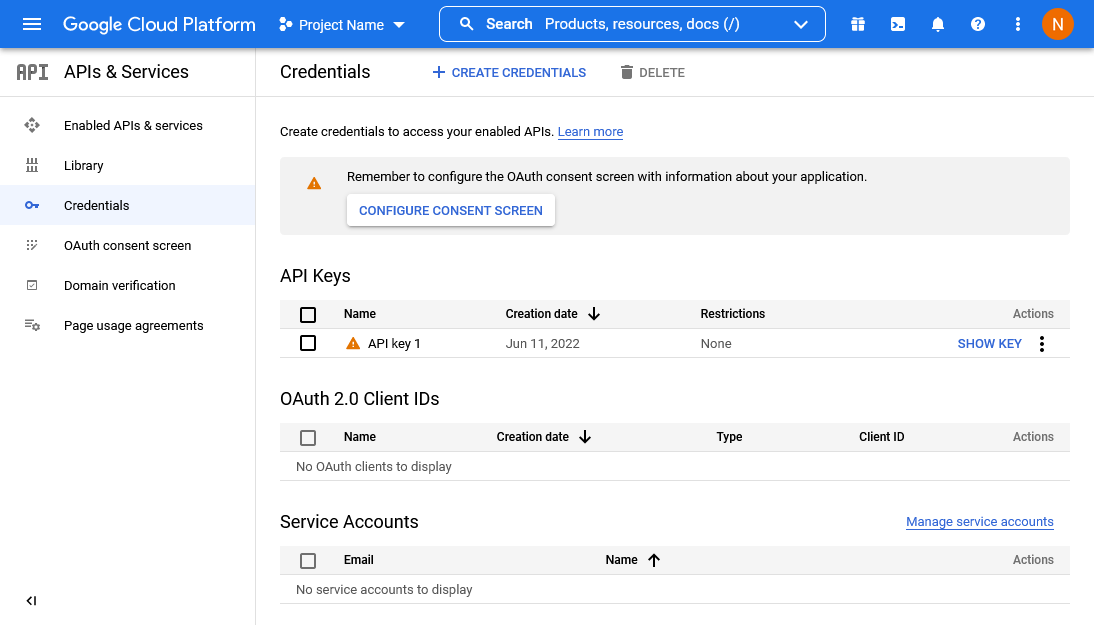
Для настройки API ключа для данной учетной записи нажмите на имя вашего ключа API.
На данном экране можно задать название ключу, скопировать его, задать ограничения для API.
В разделе API restrictions выберите YouTube Data API v3 и нажмите Save.
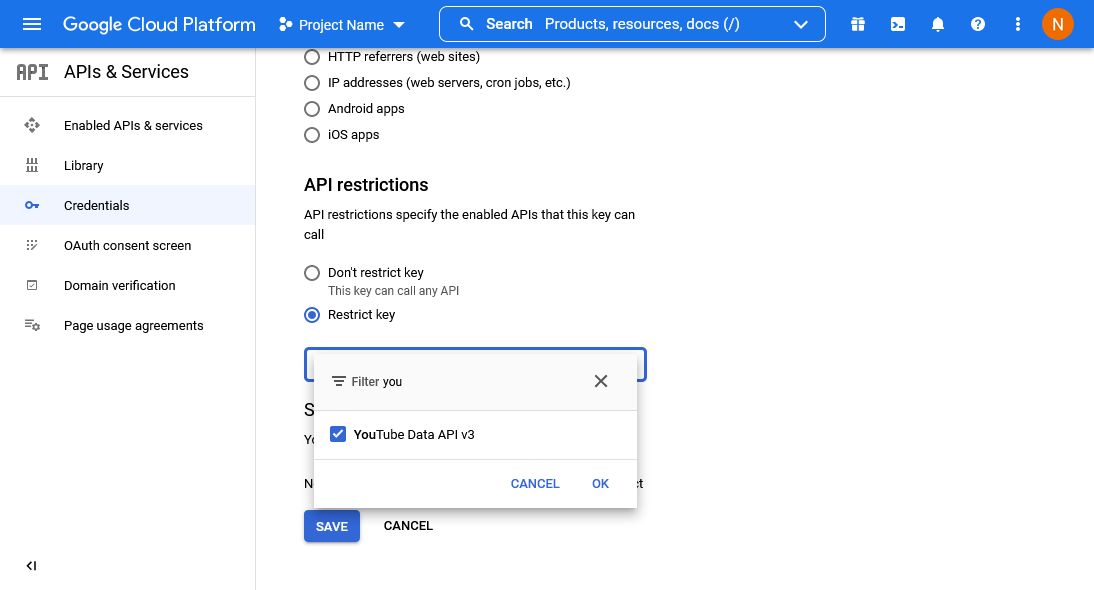
Таким образом мы активировали для данной учетной записи необходимый нам API.
Пример использования YouTube API
Например, необходимо получить данные о конкретном YouTube видео.
Значит мы будем использовать тип ресурса Videos метод list — подробнее.
Создадим функцию для получения данных о конкретном видео YouTube по его ссылке.
function getYoutubeVideoInfo($video_url)
{
    // Преобразование ссылки в id YouTube

    // Получение данных при помощи YouTube API

    // Преобразование длительности YouTube в часы:минуты:секунды
}
Преобразуем обычную ссылку на ролик YouTube в id.
$pattern = '#^(?:https?://)?(?:www.)?(?:youtu.be/|youtube.com(?:/embed/|/v/|/watch?v=|/watch?.+&v=))([w-]{11})(?:.+)?$#x';
preg_match($pattern, $video_url, $matches);
$video_id = (isset($matches[1])) ? $matches[1] : false;
Теперь нужно воспользоваться полученным ранее ключом API и получить необходимую информацию о видео.
$api_key = "AIzaSyAwGUSLR-S7iSRFO6JDZwlEskC_5M6zeys";
$url = "https://www.googleapis.com/youtube/v3/videos?id=" . $video_id . "&key=" . $api_key . "&part=snippet,contentDetails,status";
$getData = json_decode(file_get_contents($url), true);

foreach ((array)$getData['items'] as $key => $data) {
    $video_duration = $data['contentDetails']['duration']; // Длительность ролика

    // Превью видео
    if (array_key_exists('maxres', $data['snippet']['thumbnails'])) {
        $video_poster =  $data['snippet']['thumbnails']['maxres']['url'];
    } else if (array_key_exists('standard', $data['snippet']['thumbnails'])) {
        $video_poster =  $data['snippet']['thumbnails']['standard']['url'];
    } else {
        $video_poster =  $data['snippet']['thumbnails']['high']['url'];
    }
}
Теперь нам необходимо преобразовать полученную длительностью видео YouTube в нужный нам вид. По умолчанию данные приходят в формате PT3M21S.
$start = new DateTime('@0'); // Unix epoch
$start->add(new DateInterval($video_duration));
$video_duration_seconds = $start->format('H:i:s');

return array($video_duration_seconds, $video_poster);
Итоговый код:
function getYoutubeVideoInfo($video_url)
{
    // Преобразование ссылки в id YouTube
    $pattern = '#^(?:https?://)?(?:www.)?(?:youtu.be/|youtube.com(?:/embed/|/v/|/watch?v=|/watch?.+&v=))([w-]{11})(?:.+)?$#x';
    preg_match($pattern, $video_url, $matches);
    $video_id = (isset($matches[1])) ? $matches[1] : false;

    // Получение данных при помощи YouTube API
    $api_key = "AIzaSyAwGUSLR-S7iSRFO6JDZwlEskC_5M6zeys";
    $url = "https://www.googleapis.com/youtube/v3/videos?id=" . $video_id . "&key=" . $api_key . "&part=snippet,contentDetails,status";
    $getData = json_decode(file_get_contents($url), true);

    foreach ((array)$getData['items'] as $key => $data) {
        $video_duration = $data['contentDetails']['duration']; // Длительность ролика

        // Превью видео
        if (array_key_exists('maxres', $data['snippet']['thumbnails'])) {
            $video_poster =  $data['snippet']['thumbnails']['maxres']['url'];
        } else if (array_key_exists('standard', $data['snippet']['thumbnails'])) {
            $video_poster =  $data['snippet']['thumbnails']['standard']['url'];
        } else {
            $video_poster =  $data['snippet']['thumbnails']['high']['url'];
        }
    }

    // Преобразование длительности YouTube в часы:минуты:секунды
    $start = new DateTime('@0'); // Unix epoch
    $start->add(new DateInterval($video_duration));
    $video_duration_seconds = $start->format('H:i:s');

    return array($video_duration_seconds, $video_poster);
}
Чтобы получить информацию о видео просто вызовите данную функцию:
print_r(getYoutubeVideoInfo('https://youtu.be/_Kqtj14rxes'));Получим:
Array
(
    [0] => 02:53:28
    [1] => https://i.ytimg.com/vi/_Kqtj14rxes/hqdefault.jpg
)
Вывод построчно:
echo getYoutubeVideoInfo('https://youtu.be/_Kqtj14rxes')[0];
echo "<br>";
echo getYoutubeVideoInfo('https://youtu.be/_Kqtj14rxes')[1];
Получим:
02:53:28
https://i.ytimg.com/vi/_Kqtj14rxes/hqdefault.jpg
Часто задаваемые вопросы
Остались вопросы об использовании YouTube API? Возможно вы найдёте ответ ниже.
Является ли API YouTube бесплатным?
API YouTube предоставляется бесплатно, если вы не превышаете суточную квоту запросов API. Каждый запрос стоит заранее определенное количество баллов. Вы получаете 10 000 баллов в день.
Сколько стоит API YouTube?
Плата за доступ к API данных YouTube зависит от использования квоты.
На каждый проект вам дается 10 000 бесплатных баллов в день, и все запросы стоят не менее одного балла.
Вы можете оценить свои квоты с помощью калькулятора квот, и если вам нужно больше запросов, вы можете подать заявку на более высокие квоты. Цена может измениться в большую сторону 🙂
Для примера, тип ресурса Videos с методом list YouTube API квота составляет 10 000 бесплатных единиц в день, т.к. один запрос стоит один балл.
Если у вас остались вопросы, напишите их в комментариях.
Переменные в цикле php
Надеюсь, вам понравилась данная информация. Если вам интересна тема web-разработки,
то можете следить за выходом новых статей в Telegram.
- Переменные в цикле php
- Сортировка по произвольному полю (WordPress)
- WordPress Пагинация без Плагина
- PHP ООП MySQL — Пошаговое руководство
- WordPress: Поиск по Сайту (без плагинов)
- Отправка mail() в php
Your application must have authorization credentials to be able to use the YouTube Data API.
This document describes the different types of authorization credentials that the Google API Console supports. It also explains how to find or create authorization credentials for your project.
Create your project and select API services
- Open the Credentials page in the API Console.
-
This API supports two types of credentials.
Create whichever credentials are appropriate for your project:
-
OAuth 2.0: Whenever your application requests private user
data, it must send an OAuth 2.0 token along with the request. Your
application first sends a client ID and, possibly, a client secret to
obtain a token. You can generate OAuth 2.0 credentials for web
applications, service accounts, or installed applications.For more information, see the OAuth 2.0 documentation.
-
API keys:
A request that does not provide an OAuth 2.0 token must send an API
key.The key identifies your project and provides API access, quota, and
reports.The API supports several types of restrictions on API keys. If the API key that you
need doesn’t already exist, then create an API key in the Console by
clicking Create credentials
> API key. You can restrict the key before using it
in production by clicking Restrict key and selecting one of the
Restrictions.
-
To keep your API keys secure, follow the best practices for
securely using API keys.
Один из читателей нашего ресурса задался вопросом, а можно ли получить данные о ролике с видеохостинга YouTube. Ответ – можно, но как именно, мы расскажем в следующих статьях, а в этой – научимся получать ключ для доступа по API к этому сервису, ведь без него в последующем мы не сможем получить нужные нам данные.
1. Переходим по этой ссылке. И если вы не авторизованы в сервисе – авторизуйтесь.
2. Далее на открывшейся странице в списке ищем «YouTube Data API v3» и кликаем по нему.

3. На открывшейся странице нажимаем «Включить».

4. Затем перед нами открывается новая страница, где в правом верхнем углу мы жмем «Создать».

В форме выбираем «YouTube Data API v3», «Веб-сервер (например, node.js, Tomcat)» и «Общедоступные данные».

И жмем «Выбрать тип учетных данных».
После этого у вас появится ваш API KEY, который вы сохраняете к себе в удобное для вас место и жмете – «Готово».

На этом получение ключа доступа к сервису YouTube окончено. В следующих статьях мы будем использовать его для получения различных сведений об указанном видеоролике.
Good news: There’s an easy way to use YouTube to grow your business without creating videos. You can embed existing YouTube content on your site using the YouTube API.

![Download Now: How to Use an API [Free Ebook]](https://no-cache.hubspot.com/cta/default/53/1cbd6f4c-4566-446c-852a-0a9dae73e987.png)
No scripting, no story boarding, and no filming required. Just use the content that has already been created. Let’s take a look at what the YouTube Data API is, how you can get an API key, and how you can use it for your brand.
What is the YouTube API?
The YouTube API is an application programming interface that allows you to embed videos, curate playlists, and offer other YouTube functionalities on your website. It helps businesses offer advanced video sharing features on their website or app without needing to write code from scratch.
Like other APIs (or Application Programming Interfaces), the YouTube API makes a programmer’s work easier by skipping the drudgery of writing every single line of code every time users need to access data. Instead, programmers can use predefined functions and protocols to curate YouTube videos on a website.
Additionally, the YouTube API has a wide selection of features and functionalities that make it accessible to developers and valuable to businesses. It allows you to retrieve data at a mass scale without needing to access individual videos and channels.
With that in mind, what kind of data can you feature using the YouTube API? Let’s take a look.
YouTube API Data
The YouTube API gives you access to YouTube’s data in a more comprehensive, scalable way than standalone YouTube embed codes would. You can retrieve entire playlists, users’ uploads, and even search results using the YouTube API. You can also add YouTube functionalities to your website so that users can upload videos and manage channel subscriptions straight from your website or app.
Let’s take a look at some of the most popular functionalities of the API. This is not an exhaustive list; we recommend perusing Google’s official documentation.
| YouTube Resource | Example HTTP Request | Description |
| i.e what you’d like to use the API for | i.e one possible request you could make with this resource | i.e what the action would look like on your website or app |
|
YouTube Search |
GET / search |
Retrieves a range of search results based on the query you’ve set. |
|
YouTube Playlists |
DELETE / playlists |
Deletes a playlist. |
|
YouTube Videos |
POST / videos |
Uploads a video to YouTube from your website or app. |
|
YouTube Comments |
POST / comments / markAsSpam |
Allows you to flag one or more comments as spam. |
|
YouTube Channels |
GET / channels |
Retrieves a channel’s videos or playlists (or any other resource, such as comments). |
|
YouTube Subscriptions |
POST / subscriptions |
Adds a subscriber to an authenticated user’s channel. |
|
YouTube Channel Members |
GET / members |
Retrieves a list of members for a channel that has given you authorization. |
|
YouTube Captions |
PUT / captions |
Updates a caption track (you can upload a new file or change it to a draft). |
|
YouTube ChannelSections |
POST / channelSections |
Allows you to add a section of featured videos, for example, to an authenticated user’s channel. |
|
YouTube Watermarks |
POST / watermarks / unset |
Allows you to remove a watermark image associated with a channel. |
Benefits of Using the YouTube API
Many marketers and business owners are missing out on the benefits of incorporating YouTube into their digital marketing strategy. Usually, it’s a question of how much time it takes to create high-quality video content.
In a typical YouTube marketing strategy, you would consistently publish video content every week with the hopes of generating likes and subscribers — a portion of which you’d hope would convert into customers. Luckily, this is no longer the only way to use YouTube for your business. YouTube has created an API that allows you to integrate your website with the social platform.
Here are some of the greatest benefits of using the YouTube API:
- You can take advantage of existing content. With the YouTube API, you don’t have to spend valuable time and resources creating content. Instead, you can take advantage of the content that has already been published to increase user engagement on your site.
- YouTube is one of the top social media platforms. With more than two billion active users in more than 100 countries, YouTube is the top video streaming app. It’s also the second-largest search engine, the second most popular social platform, and the second most visited site on the internet.
- Featuring YouTube’s content can increase your dwell time. Because the YouTube API can help you add YouTube content to your website, it will help users stay on the page for longer as they watch the content that you’ve specifically curated for them. This increase in dwell time signals to search engines that your content is valuable, boosting your rankings for target keywords.
- Using the API can help you convert more website visitors. Using the API is also valuable from a conversion rate and revenue standpoint. Prospects who engage with your content and stay on your website are more likely than not to make a purchase.
Using the YouTube API is a no-brainer for many marketers, but YouTube doesn’t allow just anyone to access this valuable tool or its data. To prevent potential abuse, YouTube grants each user a unique API key that allows them to connect their website or app to the platform.
Each API key is designated for an individual project. If you’re using the API on two different websites, you should create two different API keys.
Now, let’s go over how to get a YouTube API key step-by-step.
- Log in to Google Developers Console.
- Create a new project.
- On the new project dashboard, click Explore & Enable APIs.
- In the library, navigate to YouTube Data API v3 under YouTube APIs.
- Enable the API.
- Create a credential.
- A screen will appear with the API key.
If you’d prefer to watch a video, check out this walkthrough by DAIMTO Developer tips:
1. Log in to Google Developers Console.
You can log in to Google Developers Console using your Google account. If you don’t yet have one, you’ll need to create one.
2. Create a new project.
Once you log in, you’ll automatically be taken to an empty dashboard. On the upper right-hand corner, click Create Project.
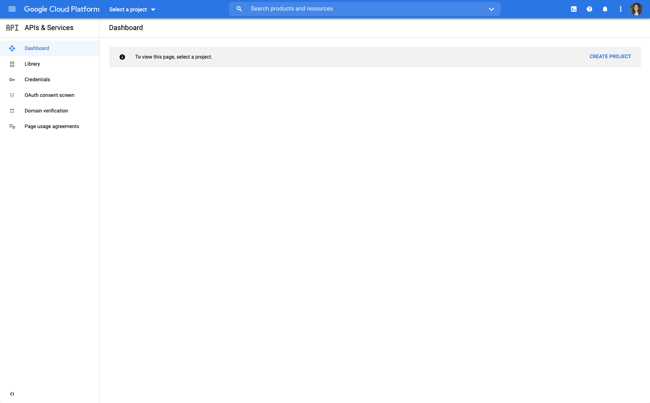
Image Source
You’ll be taken to a screen where you can add a project name, select your organization, and select a location (URL).
You can create a project without an organization. If you don’t have an organization, you won’t be prompted to select a location.
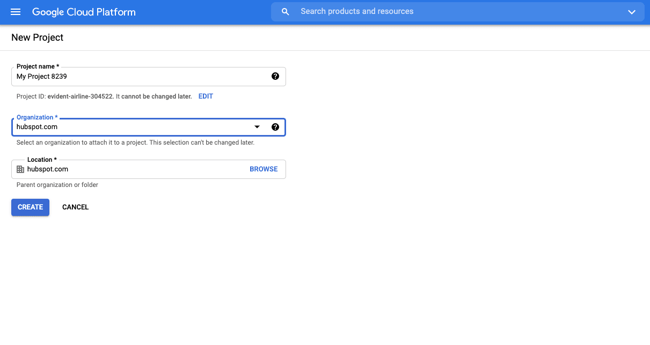
Image Source
Once you create a project, everything you do from here onwards, including creating the API key, will apply to that specific project. If you have multiple projects going at the same time, ensure that the correct one is selected by double-checking that the project is listed on the top navigation bar.
3. On the new project dashboard, click Explore & Enable APIs.
After creating a project, you’ll be taken to a brand new dashboard with different cards: Project Info, Resources, and so on.
Navigate to the Getting Started card and click on Explore & Enable APIs.
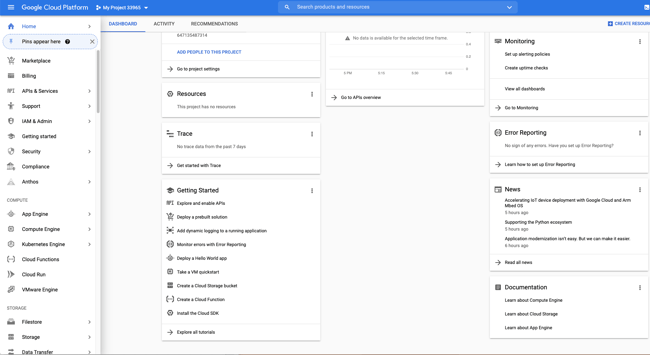
Image Source
Alternatively, on the sidebar, navigate to APIs & Services > Library.
4. In the library, navigate to YouTube Data API v3 under YouTube APIs.
Once you’ve reached the library, you’ll see a page divided into sections. Navigate to the section titled YouTube APIs and select YouTube Data API v3.
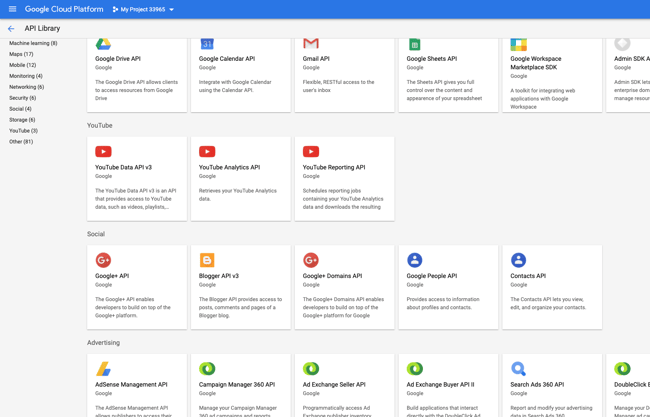
Image Source
Alternatively, you can search for the YouTube Data API on the search bar.
5. Enable the API.
After you arrive at the YouTube Data API page, click a blue button with the word Enable.
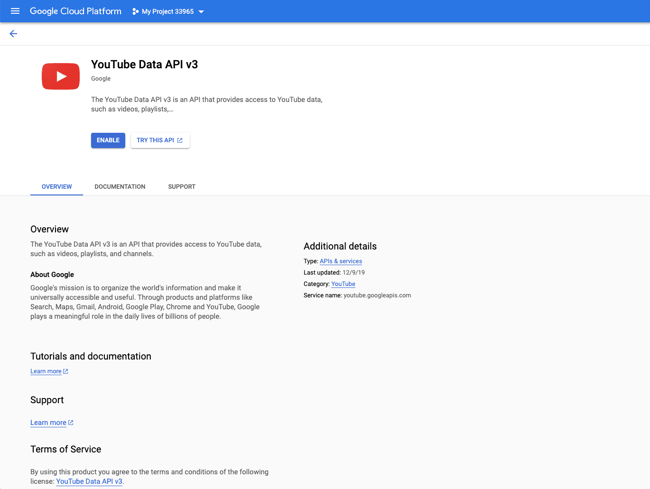
Image Source
6. Create a credential.
After clicking Enable, you’ll be taken to an overview page.
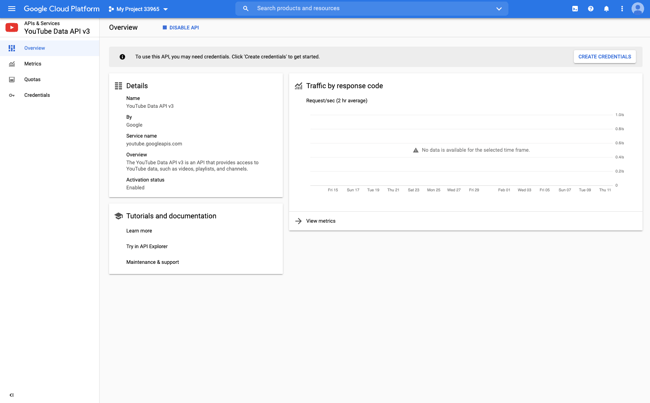
Image Source
On the top right corner, click Create Credentials.
On the Credentials window, select YouTube Data API v3 for the first blank space, Web server (e.g. node js. Tomcat) for the second, and check the Public data box on the third prompt.
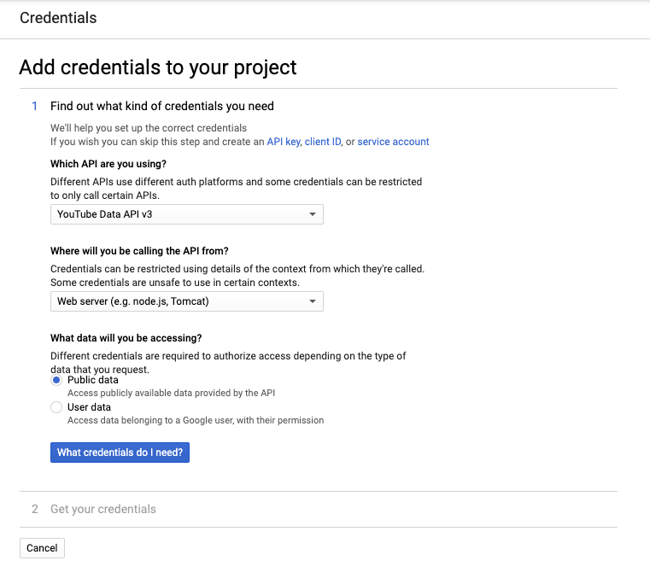
Image Source
Right below that, click on the blue button titled What credentials do I need?
After that, your API key will automatically load.
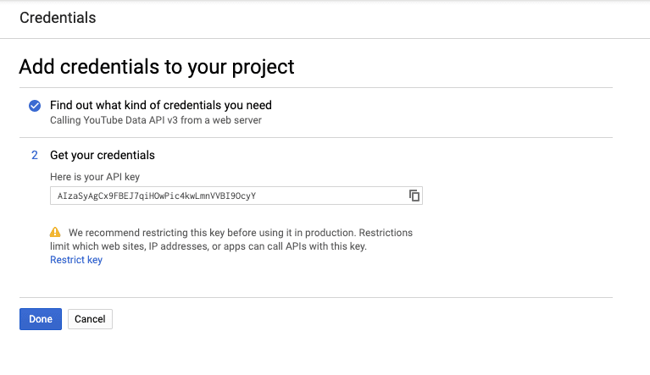
Image Source
Click Done.
7. A screen will appear with the API key.
Finished! You’ve got your API key. It’s saved in your credentials for easy retrieval.
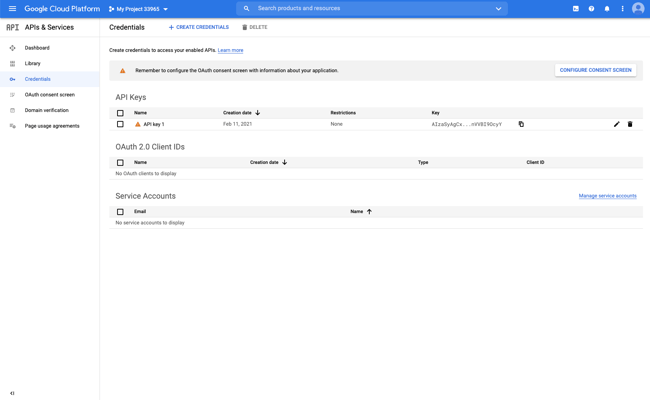
Image Source
YouTube API Key Troubleshooting
Where is My YouTube API Key?
Have you created an API key but don’t know how to find it? We’ll walk you through the process of finding it step-by-step.
- Step 1: Log in to Google Developers Console.
- Step 2: You’ll automatically be taken to your project dashboard, where you’ll see a series of cards. Under the APIs card, click Go to APIs overview.
Image Source
- Step 3: You’ll be taken to a dashboard with a sidebar. On this sidebar, click Credentials.
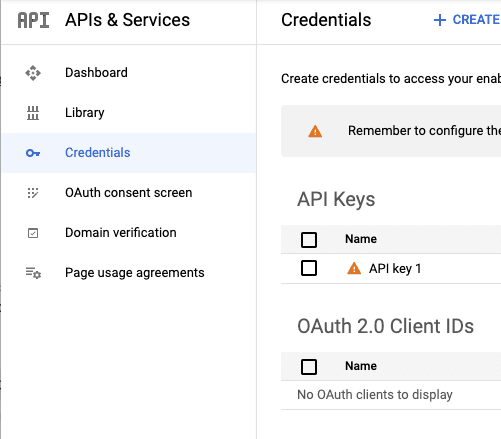
Image Source
- Step 4: All done! You’ll find the YouTube API key you created.
Image Source
My YouTube API Key is Not Working
Glitches happen all the time, especially when it comes to APIs.
Your API key may not be working because you’re using it for the wrong project. Be sure you’re using the key for the project that you created it for, especially if you created multiple projects at the same time.
If it’s still not working, consider creating a new API key entirely.
Once you’ve retrieved your YouTube API key, you can use it to call YouTube’s data. One other highly beneficial use is live-streaming events for your business. This will require you to access the YouTube Live Streaming API.
How to Access YouTube Live API
1. Follow steps 1-7 above to get a YouTube API key.
First, set up your project, website, or app and then get a YouTube API key. This key will let you access YouTube’s Live Streaming API.
Don’t forget to register your app with Google so that your API requests are successfully authenticated.
2. Learn the resources associated with the YouTube Live API.

The YouTube Live Streaming API has a distinct set of resources you can make API calls for. These include:
- liveBroadcast refers to the metadata of your live YouTube video.
- liveStream refers to the actual content you’ll be transmitting during your live event.
- liveCuepoint refers to an ad break in your live video.
The YouTube Live API also shares some resources with the YouTube Data API, including:
- video refers to a single YouTube video.
- videoAdvertisingOptions refers to the ad settings for your broadcast.
- asset refers to a piece of intellectual property (such as a scene from a movie or show) that’s not owned by you.
- policy refers to any rules or policies that your live broadcast or YouTube video is under.
3. Learn what you can do with certain resources.
For each of these resources, you can complete a certain set of actions, which are called “methods.” The methods you can use will vary depending on the resource you’re trying to create an API call for.
For instance, you can do the following with a liveBroadcast resource:
- list: Allows you to retrieve a range of broadcasts that match your request parameters.
- insert: Allows you to create a live broadcast.
- update: Allows you to change a live broadcasts’ metadata or settings.
- delete: Allows you to delete a broadcast.
And much, much more. It all depends on what exactly you’re trying to do. If you’re feeling at a loss and don’t know how to use the YouTube Live Streaming API for, say, your WordPress website, you might consider using a plugin such as WP YouTube Live.
4. Try it out using Google’s API explorer tool.
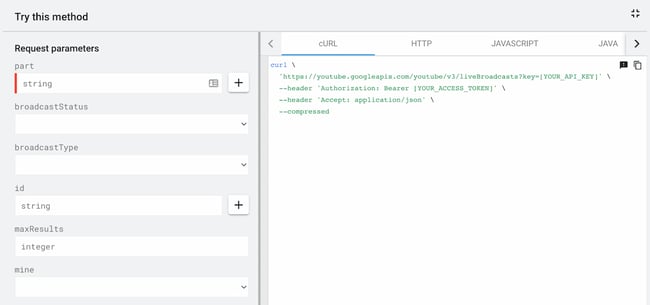
Before you touch a single line of your code on your actual app or website, try out the Live Streaming API using Google’s built-in API explorer tool. In it, you can specify parameters such as broadcastStatus, broadcastType, pageToken, and more (but the fields will vary depending on the resource and method you’re testing). This allows you to draft up the code in a sandbox environment without manipulating the code you’ve already written for your website or app.
If you’re looking for more general examples of the YouTube Data API, you’re in luck. Below, we share some code samples for common things you might want to do using the API.
YouTube API Examples
 What are some other ways you can use the YouTube API on your website or app? Below, you’ll find useful code samples for common YouTube API use cases.
1. Retrieving Your Uploads
The following code samples allow you to retrieve your own or another user’s uploads. Choose the one that aligns with the coding language or platform you’re using.
AppsScript
See the Pen YouTube API Example: Retrieving Uploads by Christina Perricone (@hubspot) on CodePen.
Go
See the Pen YouTube API Example: Retrieving Uploads (Go) by Christina Perricone (@hubspot) on CodePen.
.NET
See the Pen YouTube API Example: Retrieving Uploads (.NET) by Christina Perricone (@hubspot) on CodePen.
Ruby
See the Pen YouTube API Example: Retrieving Uploads (Ruby) by Christina Perricone (@hubspot) on CodePen.
2. Retrieving Search Results for a Certain Keyword
You can use the YouTube API to retrieve search results for a certain keyword. Use the code samples below to do so.
AppsScript
See the Pen YouTube API Example: Search (AppsScript) by Christina Perricone (@hubspot) on CodePen.
Go
See the Pen YouTube API Example: Search (Go) by Christina Perricone (@hubspot) on CodePen.
.NET
See the Pen YouTube API Example: Search (.NET) by Christina Perricone (@hubspot) on CodePen.
Ruby
See the Pen YouTube API Example: Search (Ruby) by Christina Perricone (@hubspot) on CodePen.
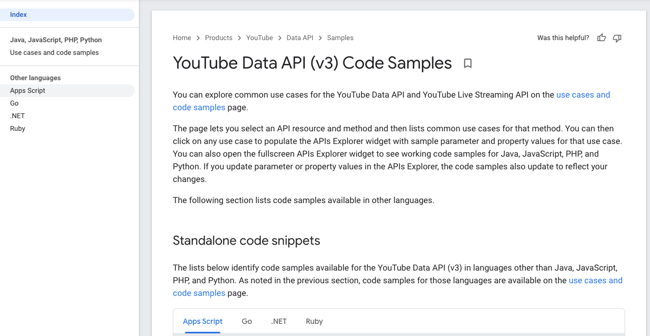
For more AppsScript, Go, .NET, and Ruby code samples, click here.
Custom YouTube API Code Samples
If you’re using Java, JavaScript, PHP, Python, or curl to connect your website or app to the YouTube API, click here to access code samples you can customize.
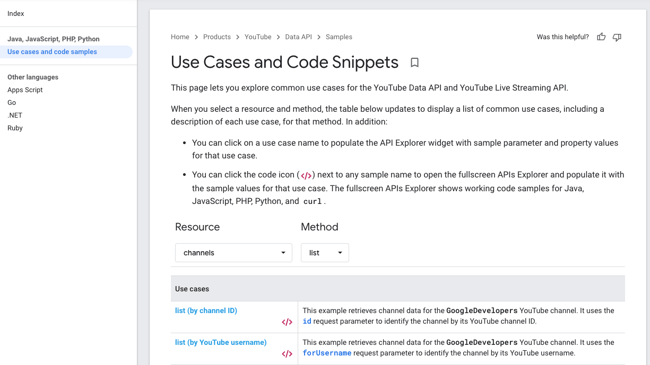
To create a code sample for your specific use case, take the following steps.
- Choose a resource. This refers to the data you want to retrieve using the API. For example, you can choose “channels,” “videos,” “playlists,” and “search.”
- Choose a method that aligns with what you’re generally looking to do. For “videos,” for example, you can choose “list,” “getRating,” or “insert.”
- Find the use case that aligns with what you specifically want to do. For instance, after choosing “videos” as your resource and “list” as your method, you can either get a code sample for listing YouTube’s most popular videos or listing your liked videos.
- Click the </> next to the use case. This will open up a “Try this API” window where you can customize the request parameters, such as the videoCategoryId and regionCode.
- After you’re finished customizing, click Execute. You’ll be prompted to log in and provide access to the API Explorer. You’ll then be taken back to the previous window, where your code snippet has been generated.
How to Use the YouTube API on Your WordPress Website
If you’re new to APIs and don’t know how to use it on your website, you’re in luck. It’s relatively simple to do even if you don’t have any advanced technical knowledge.
One of the most effective ways to promote your business through video marketing, without creating the videos yourself, is to curate YouTube content. With so much content already being created on YouTube (300 hours of video per minute), browsing on the platform can get overwhelming for the user.

Image Source
Using a plugin and a YouTube API key, you can step in and develop standalone content or lists of videos about specific subjects within your industry. This will make it easier for your audience to discover quality YouTube content while promoting the content creator for free. Your payment comes about in the form of growing website traffic.
Video is also a great way to illustrate your points when writing blog posts. It delivers the message faster, can cover more depth, and is the preferred content consumption method for many.
Here are some WordPress YouTube plugins you can use to engage your visitors on your WordPress website. For each of these plugins, you’ll need a YouTube API key.
1. WonderPlugin
WonderPlugin lets you embed a playlist gallery on your website using a YouTube API key. You can also embed YouTube carousels.
2. VideographyWP
VideographyWP is a handy plugin that allows you to replace featured images with featured videos. After you input a YouTube API key into the plugin’s settings, the plugin retrieves the video for you without you needing to code it into the theme or page.
3. Automatic YouTube Gallery
Automatic YouTube Gallery is as automatic as it sounds. To create a video gallery on your WP website, simply input the name of the channel, user, search term, or playlist into the plugin’s settings. You’ll need a YouTube API key for this plugin to automatically retrieve the data.
4. WP YouTube Lite
WP YouTube Lite allows you to embed videos on your site without slowing down your page speed. Using the YouTube API, it loads YouTube videos into a much lighter video player that will keep your page’s loading time fast.
5. Feed Them Social
The Feed Them Social plugin allows you to create and embed social media feeds on your website. It interfaces with the YouTube API to retrieve all of YouTube’s data and create a custom feed. To activate a YouTube feed, you’ll navigate to the YouTube Options page on your plugin settings and enter your API key.
YouTube API FAQs
Still have questions about using the YouTube API? We have answers below.
Is the YouTube API Free?
The YouTube API is free if you don’t exceed your daily API request quota. Each request costs a predetermined amount of points. You get 10,000 points per day.
How Much Does the YouTube API Cost?
The charge for accessing the YouTube Data API is based on quota usage. For each project, you’re given 10,000 free points per day and all requests cost at least one point.
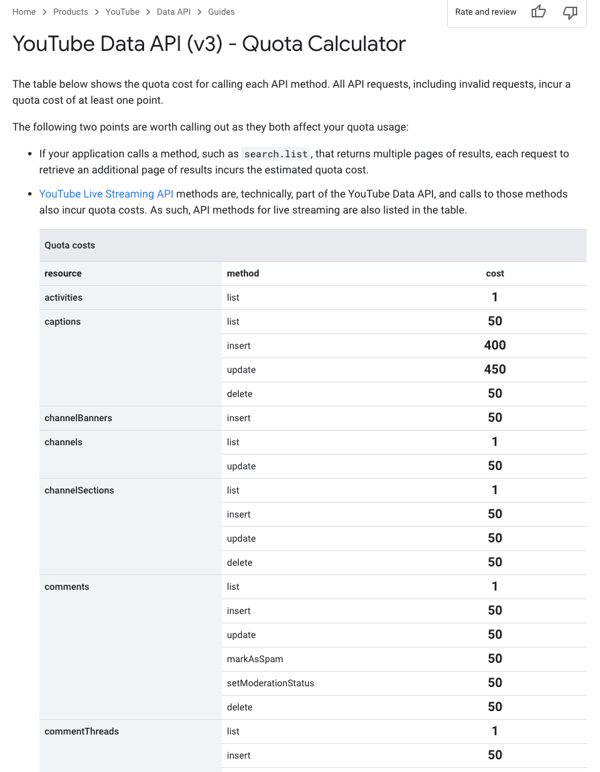
Image Source
You can estimate your quota costs using the Quota Calculator, and if you need more queries, you can apply for higher quotas. The pricing may not remain the same.
Use the YouTube API to Grow Better
YouTube can help you reach a larger audience and grow your customer base. It has an established user base, providing the perfect environment for businesses, marketers, creatives, and virtually anyone who wants to reach the public to do so easily.
Consistently creating high quality, original content can be difficult to incorporate into most marketing strategies. But with access to the YouTube Data API, you can take the second-best route to use YouTube for marketing: sharing video on your website.
Editor’s note: This post was originally published in March 2020 and has been updated for comprehensiveness.
В пост внесены дополнения и исправления 22 ноября 2022 г.
Начало:
1. YouTube API: знакомство, идентификатор канала по идентификатору видеоролика
2. YouTube API: получение своего ключа API_KEY, часть 1 (регистрация аккаунта Google)
3. YouTube API: получение своего ключа API_KEY, часть 2 (вход в консоль разработчика Google)
О том, что такое ключ API_KEY и как его можно использовать, было рассказано в первом посте серии. В этом посте я продолжаю описывать, как получить свой ключ API_KEY. На данный момент предполагается, что у вас уже есть свой аккаунт Google и вы залогинились. Кроме этого, из предыдущего поста вы уже должны знать о том, как войти в консоль разработчика Google.
3. Создание проекта в консоли разработчика Google
Насколько я понимаю, работа с консолью разработчика Google может вестись только в рамках какого-либо проекта, без этого не обойтись (подробнее о понятии «проект» можно прочесть в статье «Creating and managing projects» документации). Проекты могут быть разбиты по разным папкам и/или организациям. Для нашей узкой задачи вся эта иерархия нам пока что неинтересна. После входа в консоль разработчика Google окно моего браузера выглядит так:
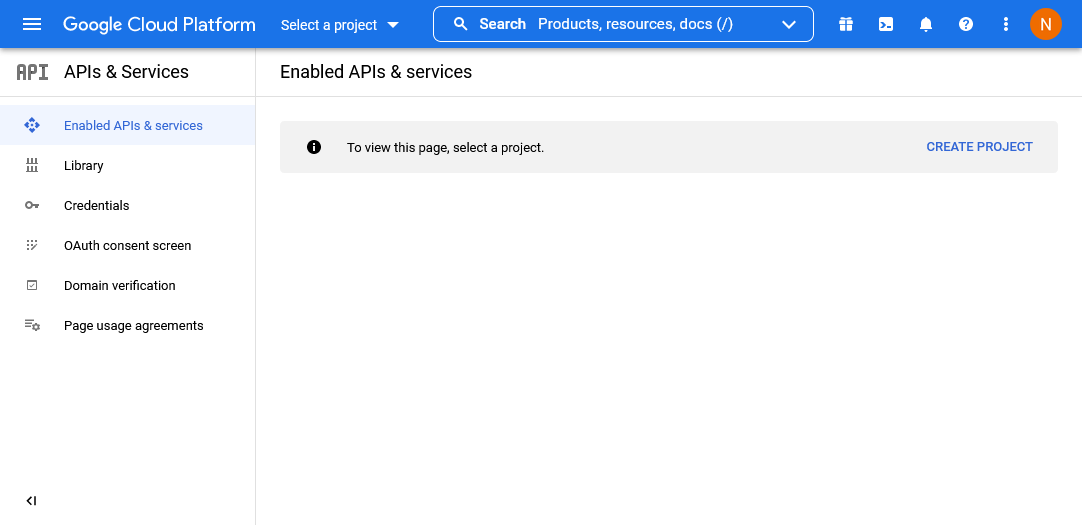
Иллюстрация 2.5 (из предыдущего поста).
На иллюстрации выше видно, что в меню слева выбран первый пункт «Enabled APIs & services», но в области справа ничего не отображается. И там объяснено, почему ничего не отображается: для дальнейшей работы следует создать проект. Для создания нового проекта можно нажать на ссылку «Create project» в области справа, после этого откроется экран создания нового проекта. Вот как он выглядит у меня:
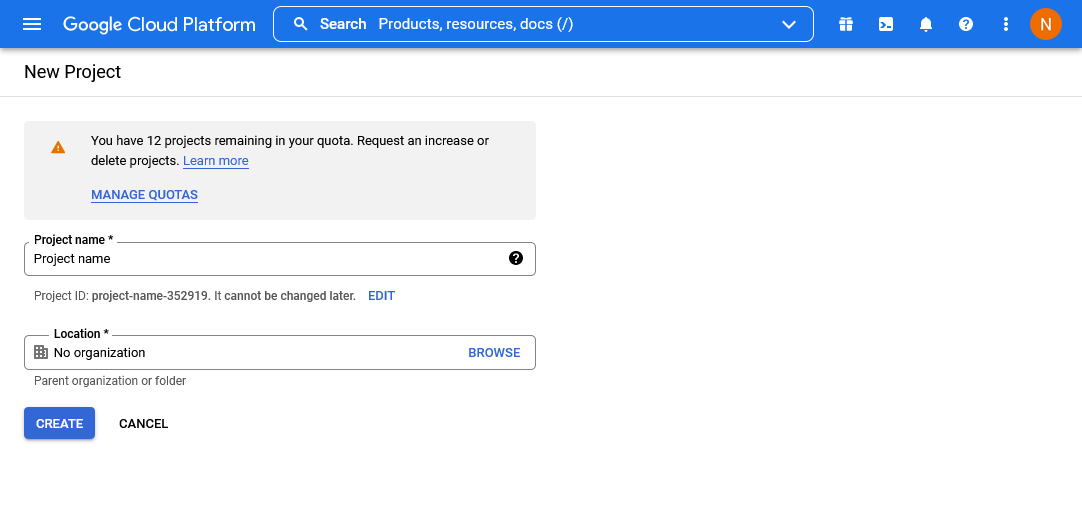
Иллюстрация 3.1.
Как видно на иллюстрации выше, там сообщается, что на первом этапе работы количество проектов, которые вы можете создать в консоли разработчика Google, ограничено некой квотой. Сейчас нам это ограничение не помешает, так как нам нужно создать всего лишь один первый проект.
Также на иллюстрации выше видно, что при создании проекта нужно указать всего лишь три вещи:
– название проекта (project name);
– идентификатор проекта (project id);
– местонахождение в иерархии проектов (location).
(Также у каждого проекта еще есть уникальный номер проекта [project number], он формируется автоматически при создании проекта и на иллюстрации выше не показан.)
Еще на иллюстрации выше сказано, что идентификатор проекта поменять после создания проекта будет нельзя (а название проекта, видимо, поменять будет можно). Я оставил значения по умолчанию (на иллюстрации выше видно, что по умолчанию местонахождением в иерархии проектов выбрана папка «No organization»; как я понял, такое местоположение выбирается для любого пользователя, пользующего веб-сервис «Google Cloud» бесплатно) и нажал на кнопку «Create» внизу экрана.
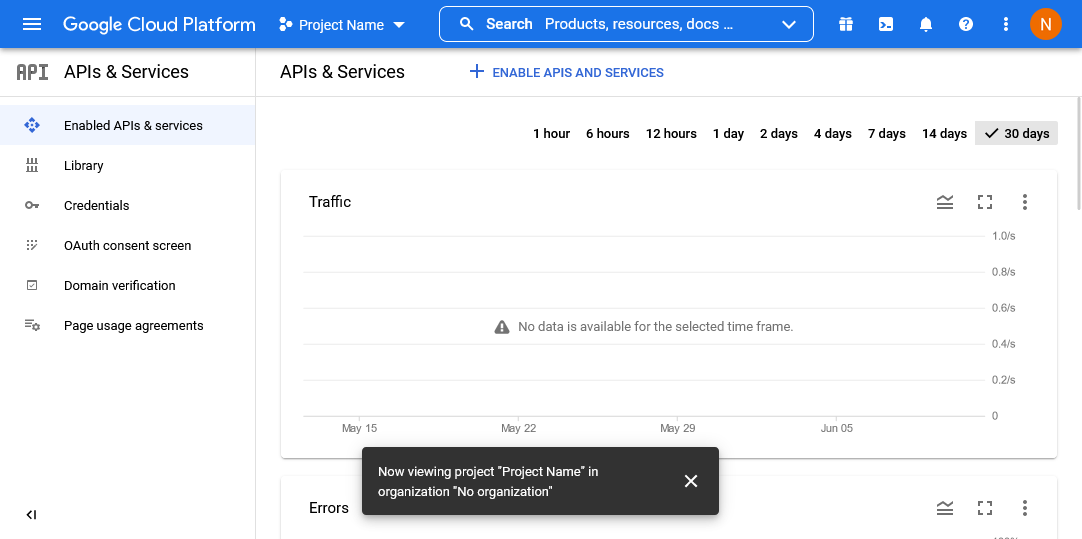
После этого проект с названием «My Project 92343» был создан и автоматически выбран активным. Вот как консоль разработчика Google выглядит у меня теперь:
Иллюстрация 3.2.
То, что проект «My Project 92343» был создан, подтверждается появлением названия этого проекта в списке справа от заголовка «Google Cloud» (см. на иллюстрации выше, я обвел название проекта красным маркером). В этом месте всегда отображается проект, выбранный активным на данный момент. Если проектов существует несколько, в этом списке можно выбрать нужный, чтобы сделать его активным. Также на иллюстрации выше видно, что в главной области окна появились некие таблицы, показывающие активность в текущем (выбранном активным) проекте.
Поначалу могут смутить два выскочивших сообщения. Верхнее окошко с уведомлением о создании нового проекта можно закрыть (и снова открыть при необходимости) нажатием на кнопку с колокольчиком (эта кнопка открывает список уведомлений, по-английски «notifications»). Нижнее сообщение (на черном фоне) можно закрыть нажатием на крестик на этом сообщении. Оно просто сообщает о том, что в данный момент в окне отображается информация по только что созданному проекту «My Project 92343» из папки «No organization». То же окно без лишних сообщений:
Иллюстрация 3.3.
4. Включение нужных API и/или веб-сервисов в созданном проекте
Как я уже описывал в предыдущих постах, у компании «Google» есть огромное количество разных API и веб-сервисов, с которыми можно работать в своем проекте. Просто так сразу работать из своего проекта с этими API и веб-сервисами не получится, для работы нужно включить (по-английски «enable») нужные из них для своего проекта.
На это намекает и ссылка «+ Enable APIs and services» (включить нужные API и/или веб-сервисы в активный проект), которую можно видеть на иллюстрации выше.
Некоторое количество API по умолчанию уже автоматически включено для нашего нового только что созданного проекта, но среди них пока нет нужного нам. Вообще, таблицы активности на иллюстрации выше для пункта меню «Enabled APIs & services», на самом деле, не являются главным в этом пункте. Главным для этого пункта является список включенных для проекта API и веб-сервисов, который можно увидеть, если прокрутить экран вниз, этот список расположен под таблицами активности проекта. Таким образом, символ «+» в назывании ссылки «+ Enable APIs and services» подразумевает добавление нового включенного API или веб-сервиса в этот список. Вот как этот список выглядит у меня (я прокрутил экран браузера вниз):
Иллюстрация 4.1.
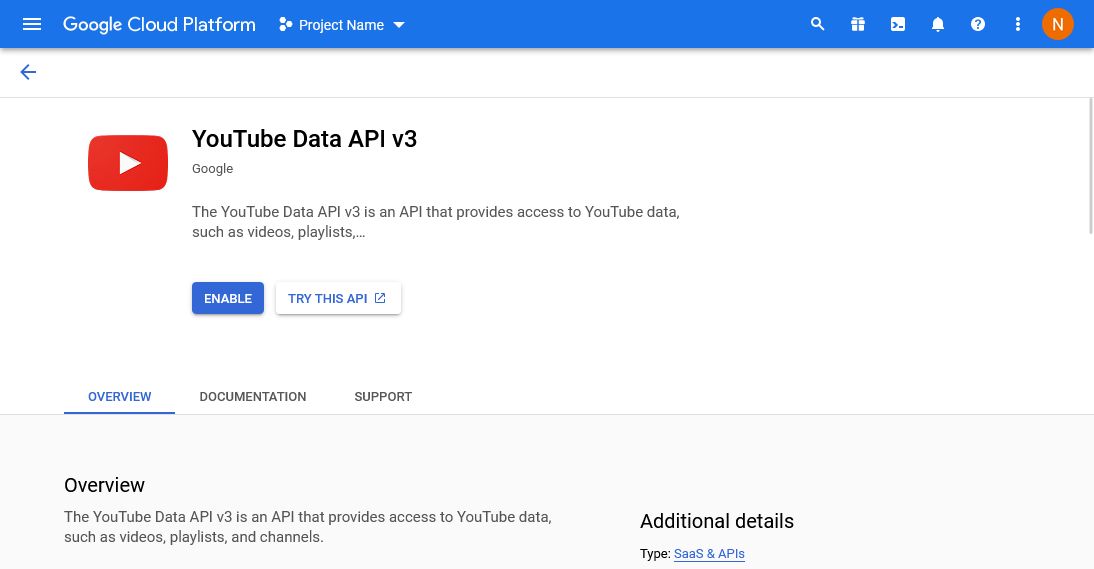
Нажмем на ссылку «+ Enable APIs and services». После этого откроется окно библиотеки всех API компании «Google» (см. иллюстрацию 4.2 ниже). (Вообще, эту же библиотеку всех API и веб-сервисов можно открыть в меню консоли слева с помощью пункта «Library».) В поле поиска введем строку «youtube data api v3» и запустим поиск, нажав клавишу «Enter» на клавиатуре. Будет найден один результат, его и следует выбрать, щелкнув по нему мышью (см. иллюстрацию 4.3 ниже).
Иллюстрации 4.2 и 4.3.

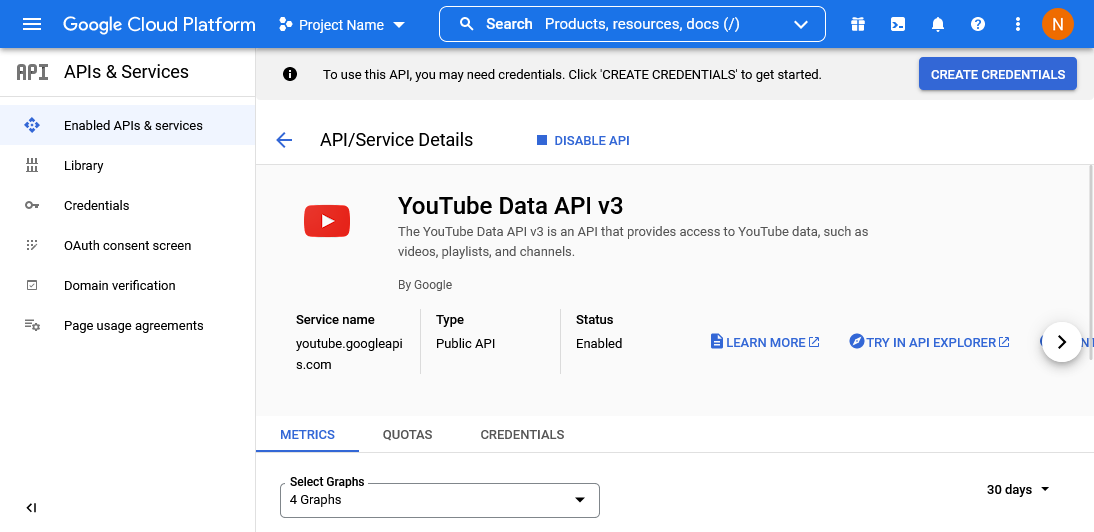
На появившейся странице выбранного API следует нажать на кнопку «Enable» (включить), см. иллюстрацию 4.4 ниже. После этого нас возвратят в наш проект и в нем уже будет включен выбранный API: «YouTube Data API v3» (см. иллюстрацию 4.5 ниже).
Иллюстрации 4.4 и 4.5.

На иллюстрации 4.5 выше показан экран подробной информации о данном API «YouTube Data API v3», поэтому он озаглавлен надписью «API/Service Details». Для возврата к списку API и сервисов, включенных для данного проекта, можно либо нажать на стрелку слева от этой надписи, либо выбрать пункт меню «Enabled APIs & services» в меню консоли слева.
5. Создание своего ключа API_KEY
Продолжение следует.